Explore Exnova's Trading Workspace: Four Modes, One Account
Exnova is not a single trading ticket with four different names. Digital Options, Binary and Blitz lead to options-style controls, while Margin opens a workspace built around an ongoing position. The account may be the same, but the fields you need to read are different.
Start with the product you want to explore. This guide follows the actual Exnova screens: where to change a mode, what the important controls do, how to enter the $10,000 practice account, and where to find login, funding and verification.
Open Exnova Platform · Choose a Trading Mode · Already registered? Sign-in steps
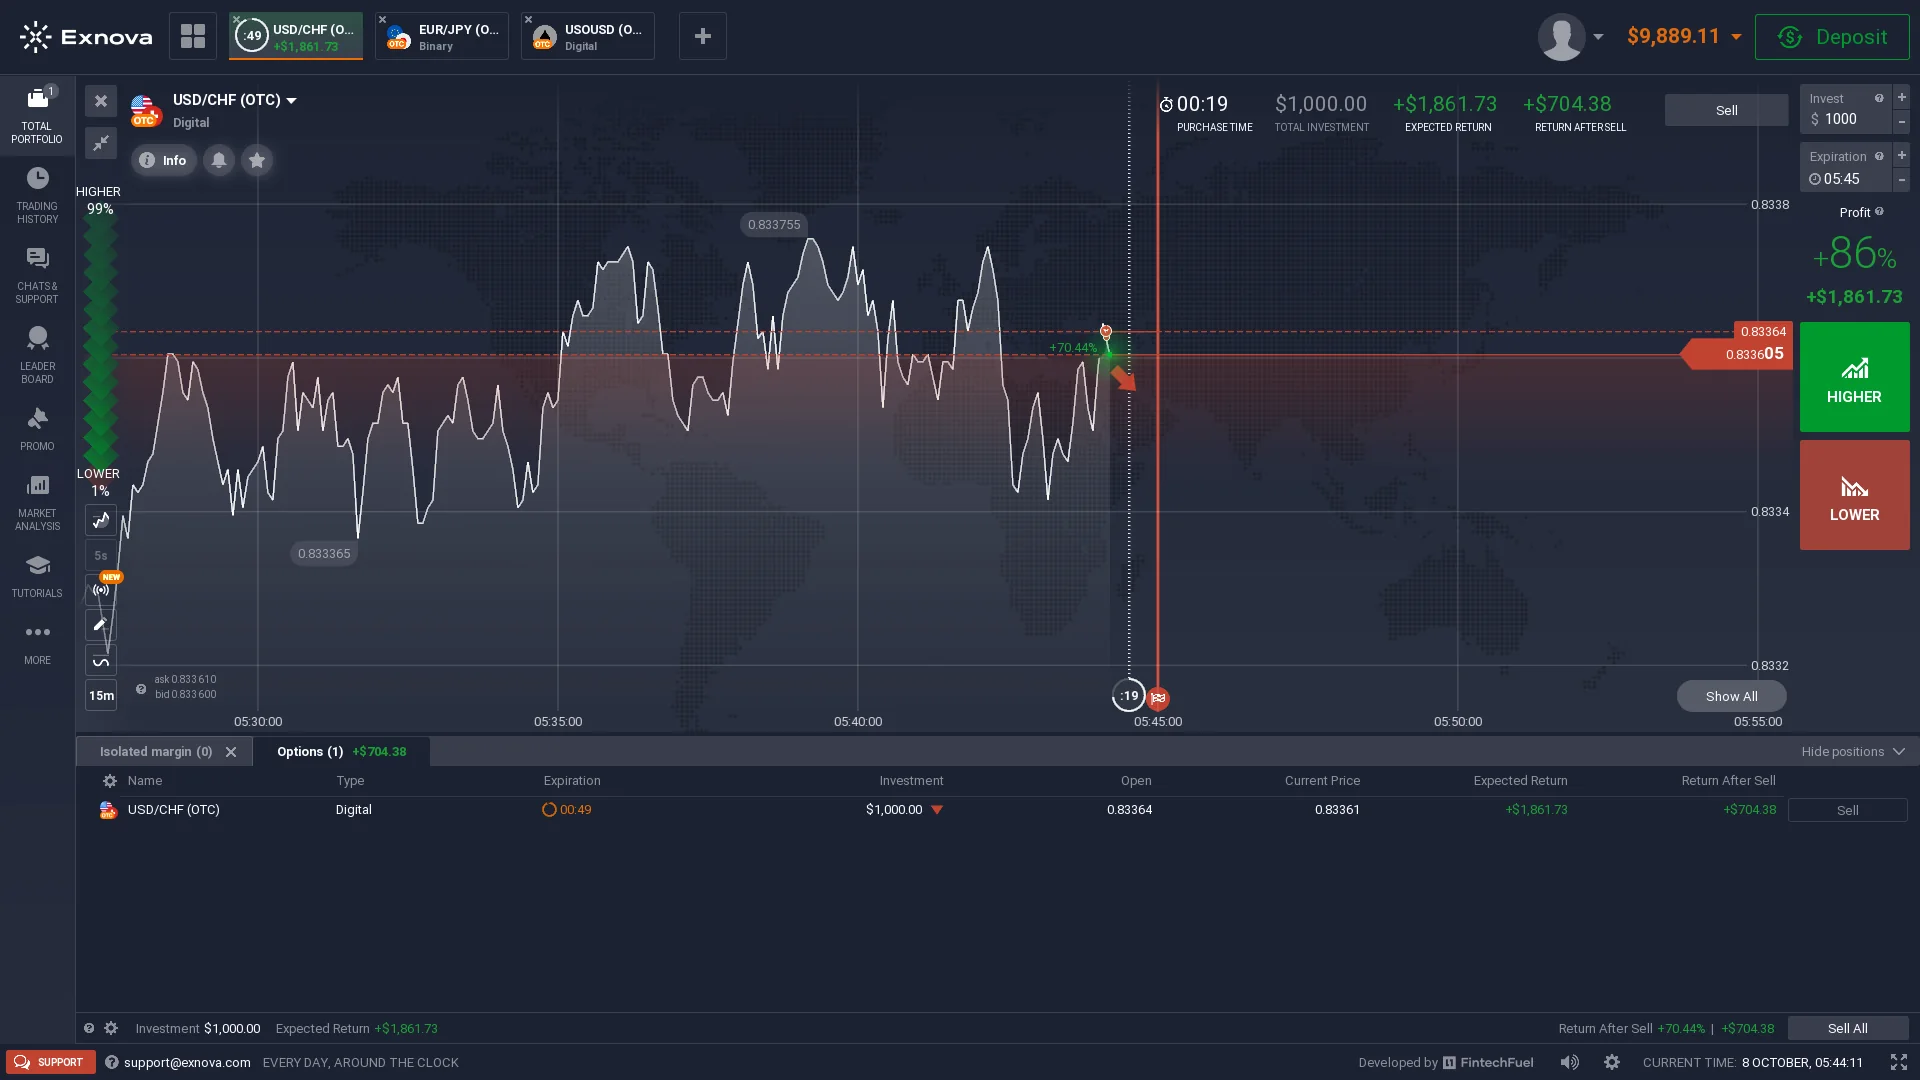
Exnova Digital workspace: the chart and order fields belong to the same screen. The screenshot is a saved interface view, not live market data.
Choose Your Exnova Workspace
The quickest way to get oriented is to separate product, asset and account balance. Product decides which order panel you see; asset selects what that panel tracks; practice or real balance decides which funds are in use. Changing one does not automatically change the others.
| Workspace | What the ticket asks you to inspect | What to look for next |
|---|---|---|
| Digital Options | Strike or price presentation, purchase window, expiry and return fields | Compare the scheduled outcome with any available early-sale figure. |
| Binary Options | Asset, direction, amount and expiration | Confirm the current contract settings before placing a directional order. |
| Blitz Options | Directional controls with especially short displayed durations on certain instruments | Read the exact duration offered for the selected asset. |
| Margin | Position size or exposure, leverage and position-management settings | Follow the position panel rather than an option-expiry countdown. |
In the selector, begin with Options to find the available Digital, Binary or Blitz tabs, or choose Margin for the separate leveraged-product area. Then choose an instrument in that product. A familiar symbol in one tab does not mean the same trade type, duration or conditions will appear in another.
If you are new to the interface, start with the practice balance. If you already have an account and know the product you want, go straight to the sign-in instructions. Those are different routes into the same overall workspace.
Digital Options: Purchase Time, Expiry and Early Sell
A Digital ticket contains two time-related ideas that are easy to confuse. Purchase Time is the window during which the contract can still be opened; Expiration is the scheduled point at which the contract outcome is determined. A purchase countdown ending is not the same event as an open contract reaching expiry.
The saved Exnova Digital screen makes the distinction visible. It shows a selected OTC currency pair, the order controls next to the chart, and — for an open example position — both an Expected Return and a Return After Sell. Those fields serve different purposes. Expected Return describes the displayed outcome for the contract conditions, whereas Return After Sell concerns the currently quoted early exit, when that facility is available. Neither is a completed-trade record until the position actually closes.
Read this screen in the right order
- Select Digital and confirm the asset at the top of the ticket, including an OTC label if one is present.
- Check the strike or current-price view. The visual chart level is not a substitute for reading the contract's selected price conditions.
- Read Purchase Time and Expiration separately, then inspect the investment amount and displayed return.
- Only then look at the Higher or Lower direction controls. For an existing position, use its own open-position panel to inspect the changing early-sale figure, if offered.
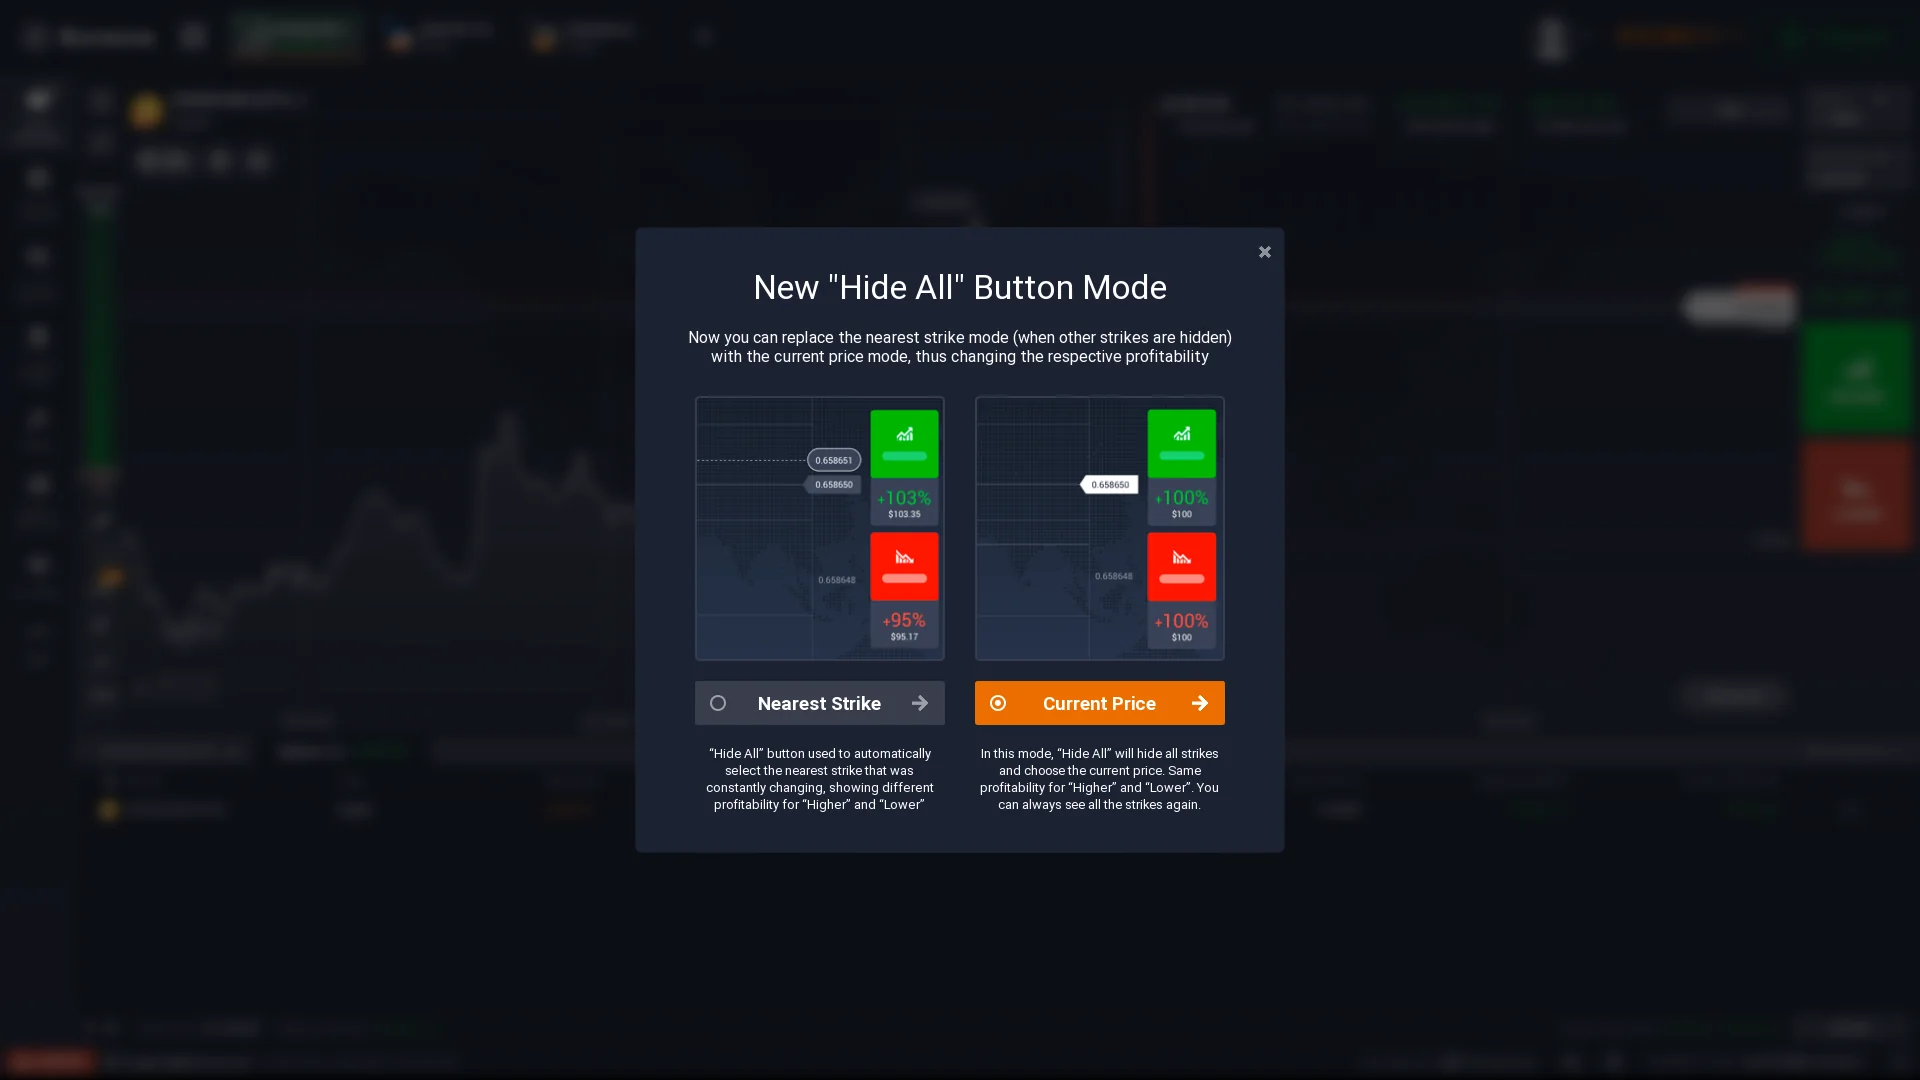
Another recorded Exnova dialog offers price-display choices including Nearest Strike and Current Price. That is useful when the chart seems to show a different reference level from the one you expected: look at the selected display mode before deciding that the ticket has changed.
A chart helps you orient yourself, but the current ticket defines the product you are actually opening. For someone arriving from a simple Higher/Lower interface, these extra price and return fields are the main reason to treat Digital as a separate workflow.
Binary or Blitz? Find the Right Ticket
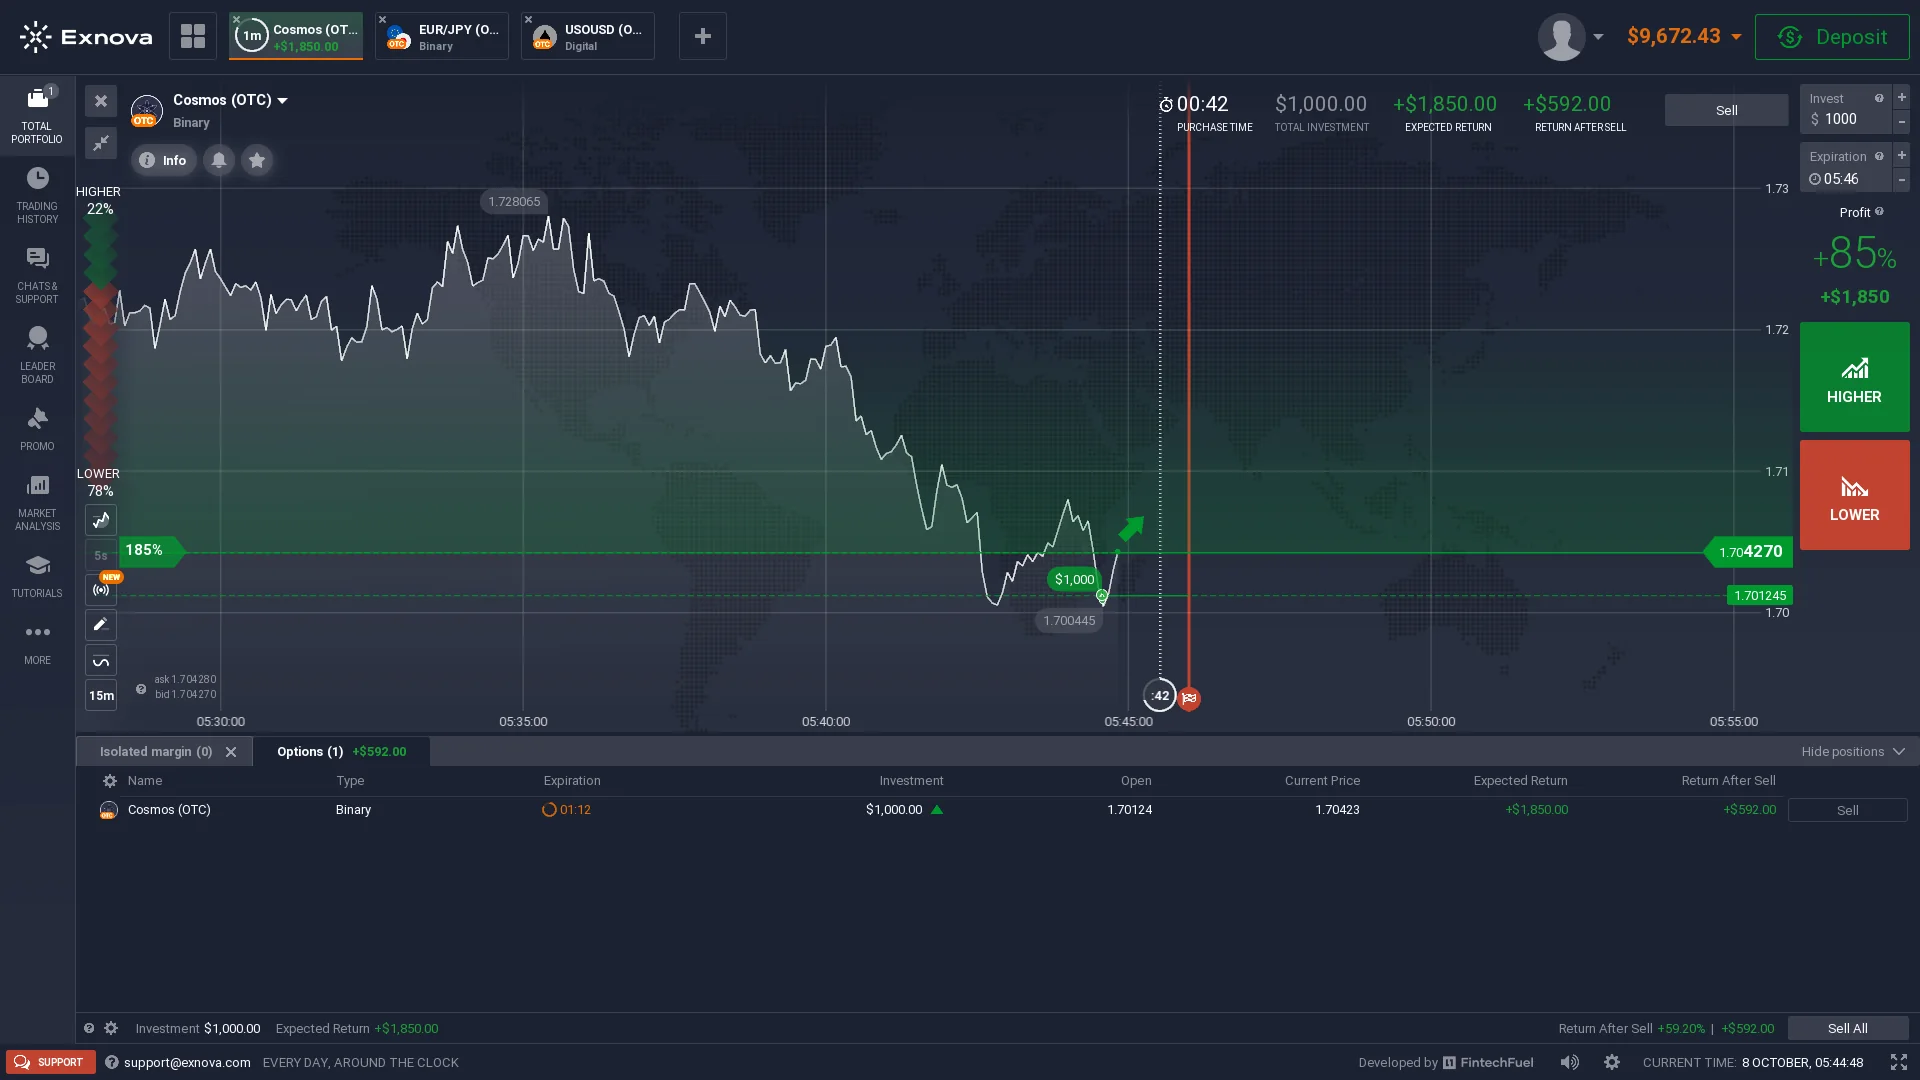
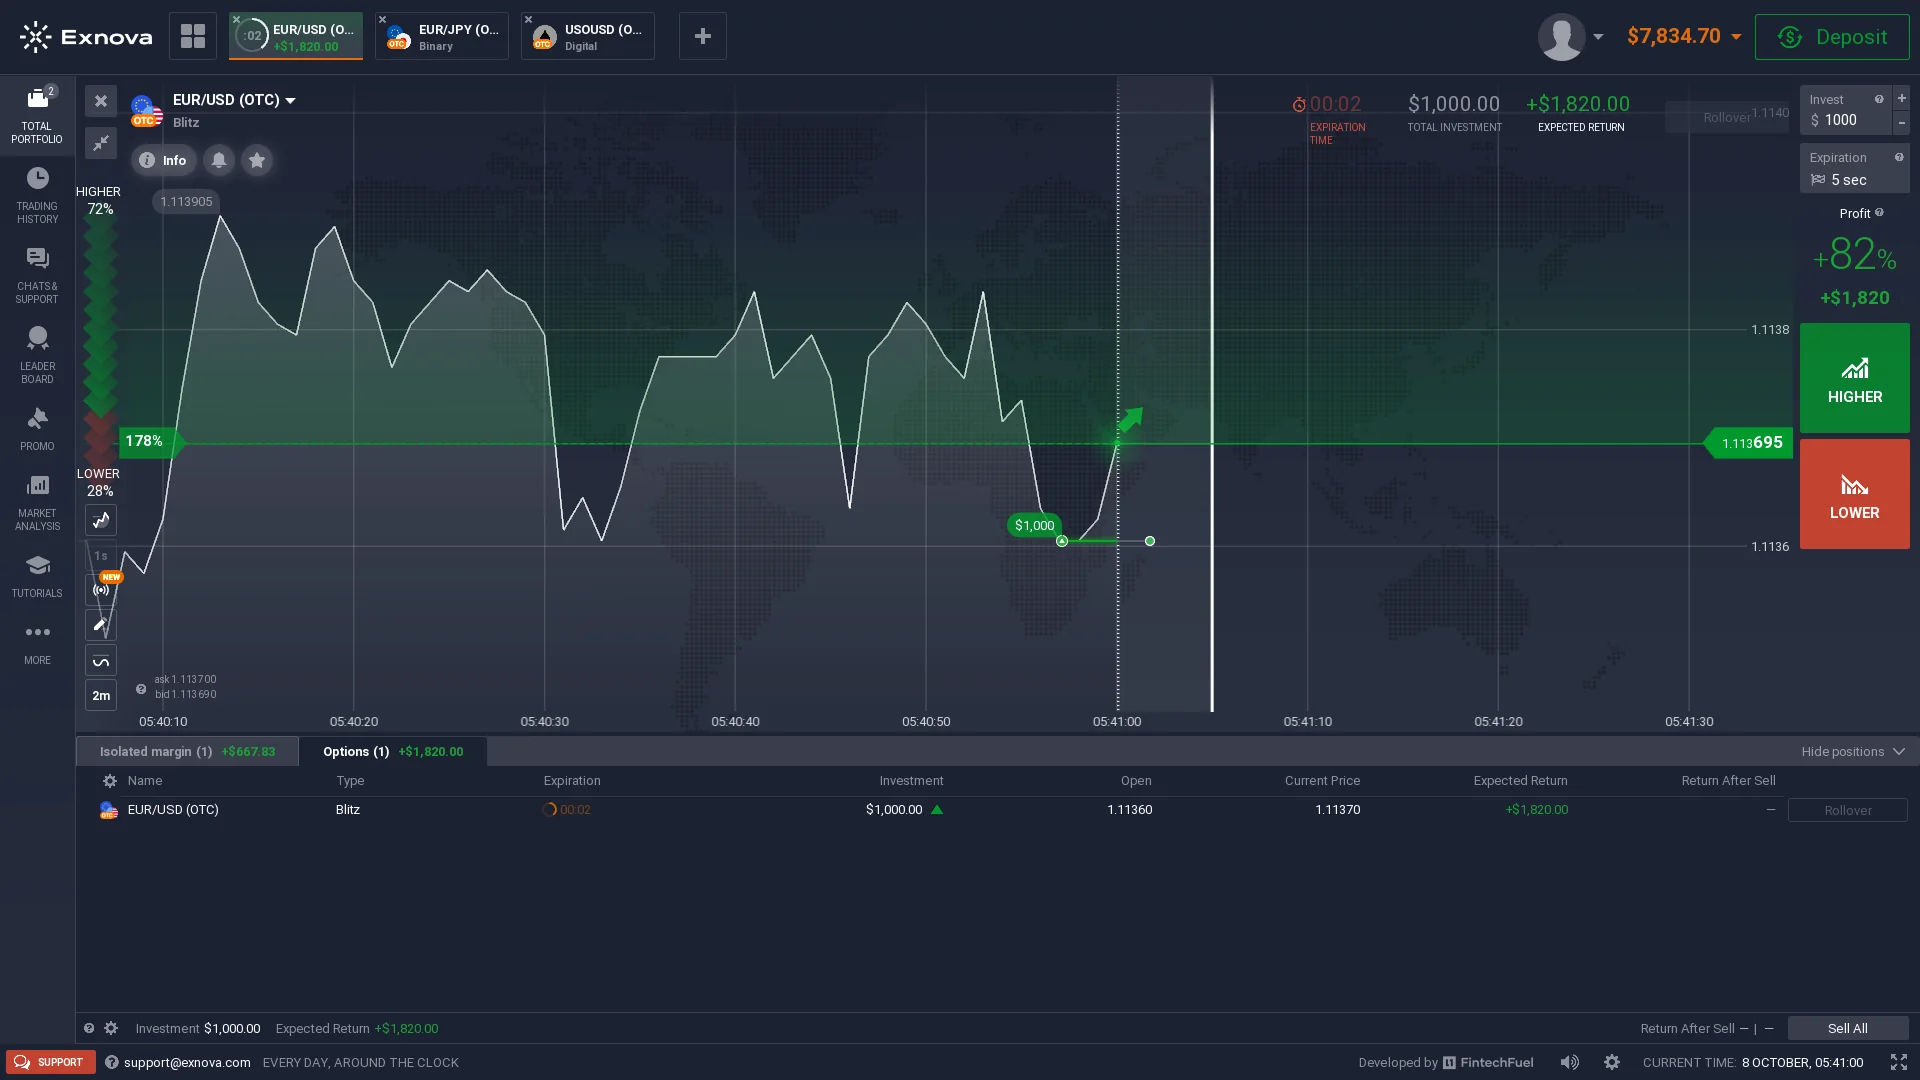
Binary and Blitz are both found within the Options family in the recorded interface, but they appear under separate product tabs. The useful distinction when moving between them is not a generic promise about speed or returns. It is the set of durations and contract settings actually displayed for the asset you selected.
Binary: open its tab, check the instrument name, expiration, investment and the currently displayed direction buttons. Read the ticket itself rather than assuming a previously selected Digital strike or duration carried across unchanged.
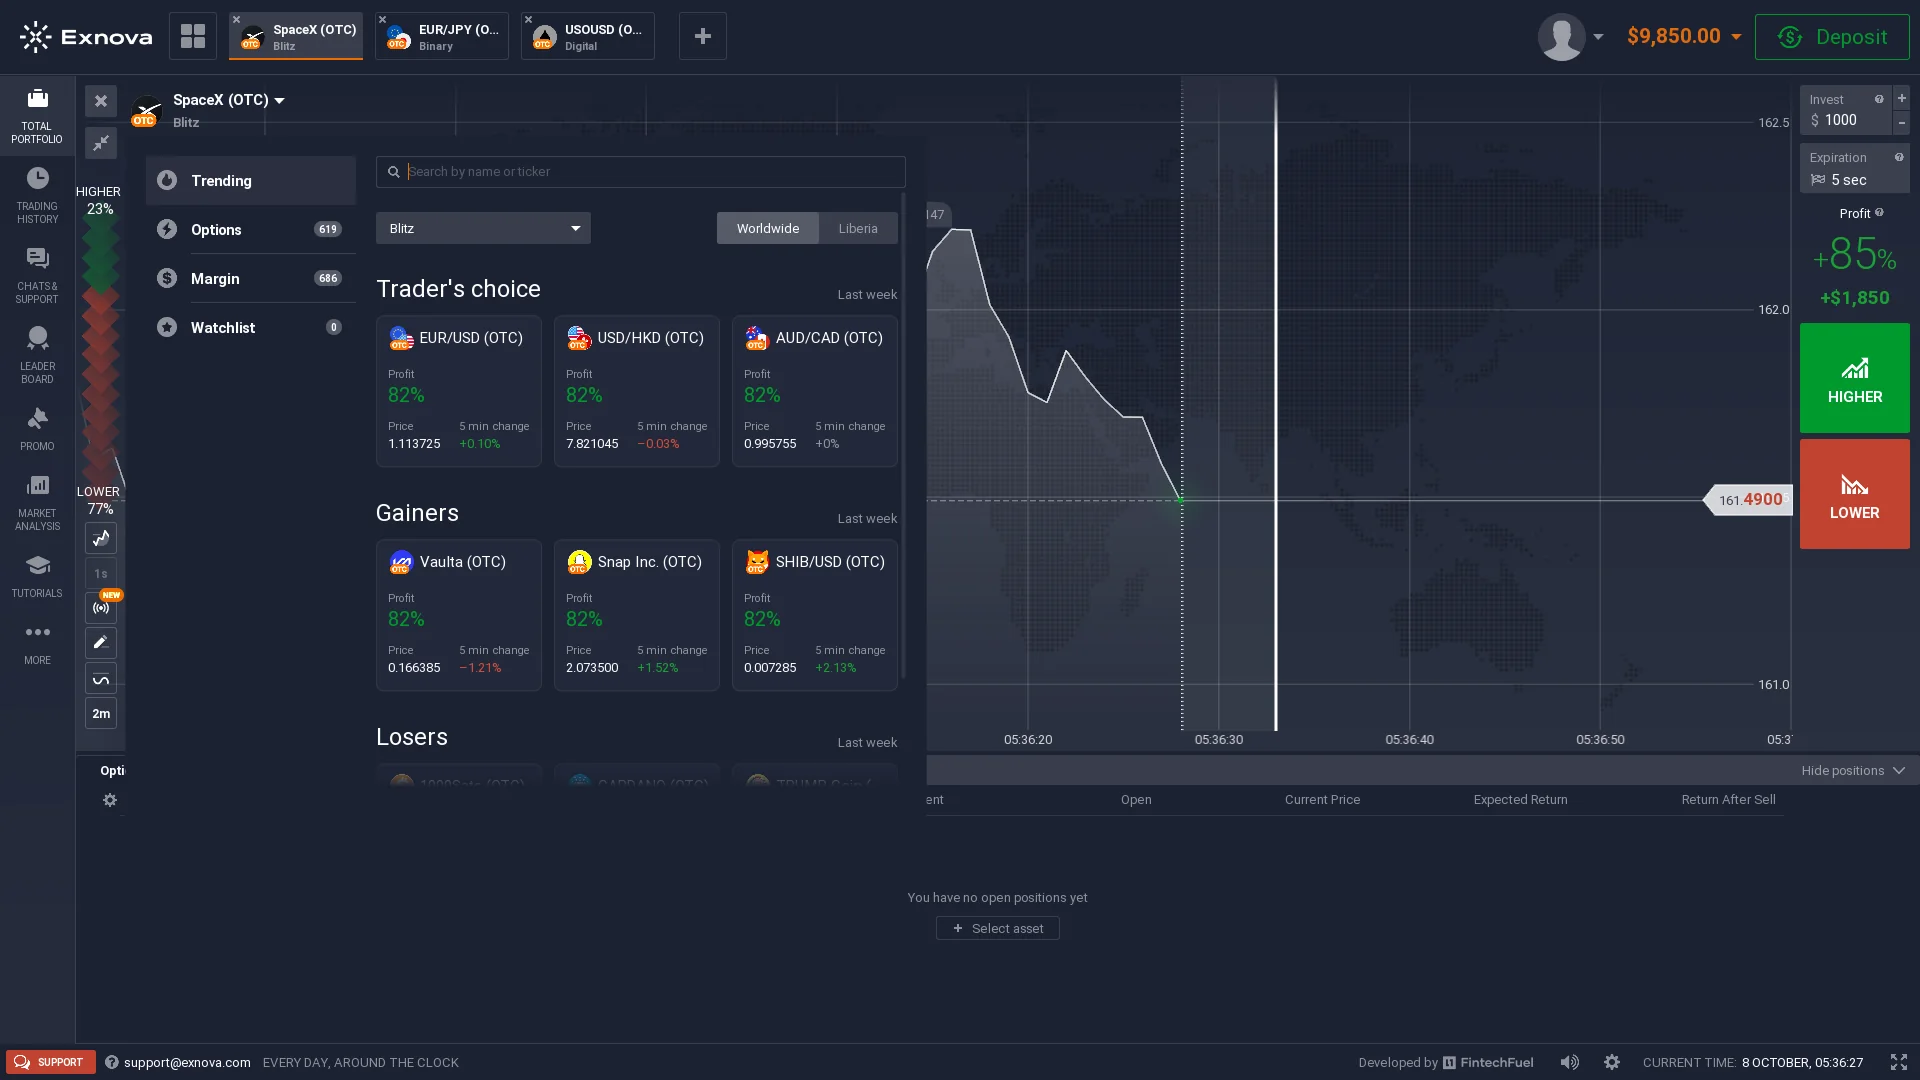
Blitz: a saved EUR/USD OTC screen shows a five-second duration. It is an example of what was available in that session, not a fixed setting for every asset or every user. If you cannot see five seconds, use the choices your current Blitz ticket actually displays.
When comparing the two, make one small test in the practice workspace: switch between Binary and Blitz, check whether the available instruments or durations change, and inspect the panel again before acting. That reveals more about the interface than treating the two names as interchangeable.
Margin Uses a Different Position Panel
The Margin workspace is a separate path, not another option that waits for a fixed Higher/Lower expiry. In the saved Exnova screen, the selected instrument is Bitcoin-PerpFuture and the panel shows fields for leverage, Take Profit, Stop Loss and the position's changing profit or loss. That gives the user a different set of controls and a different way to follow an open position.
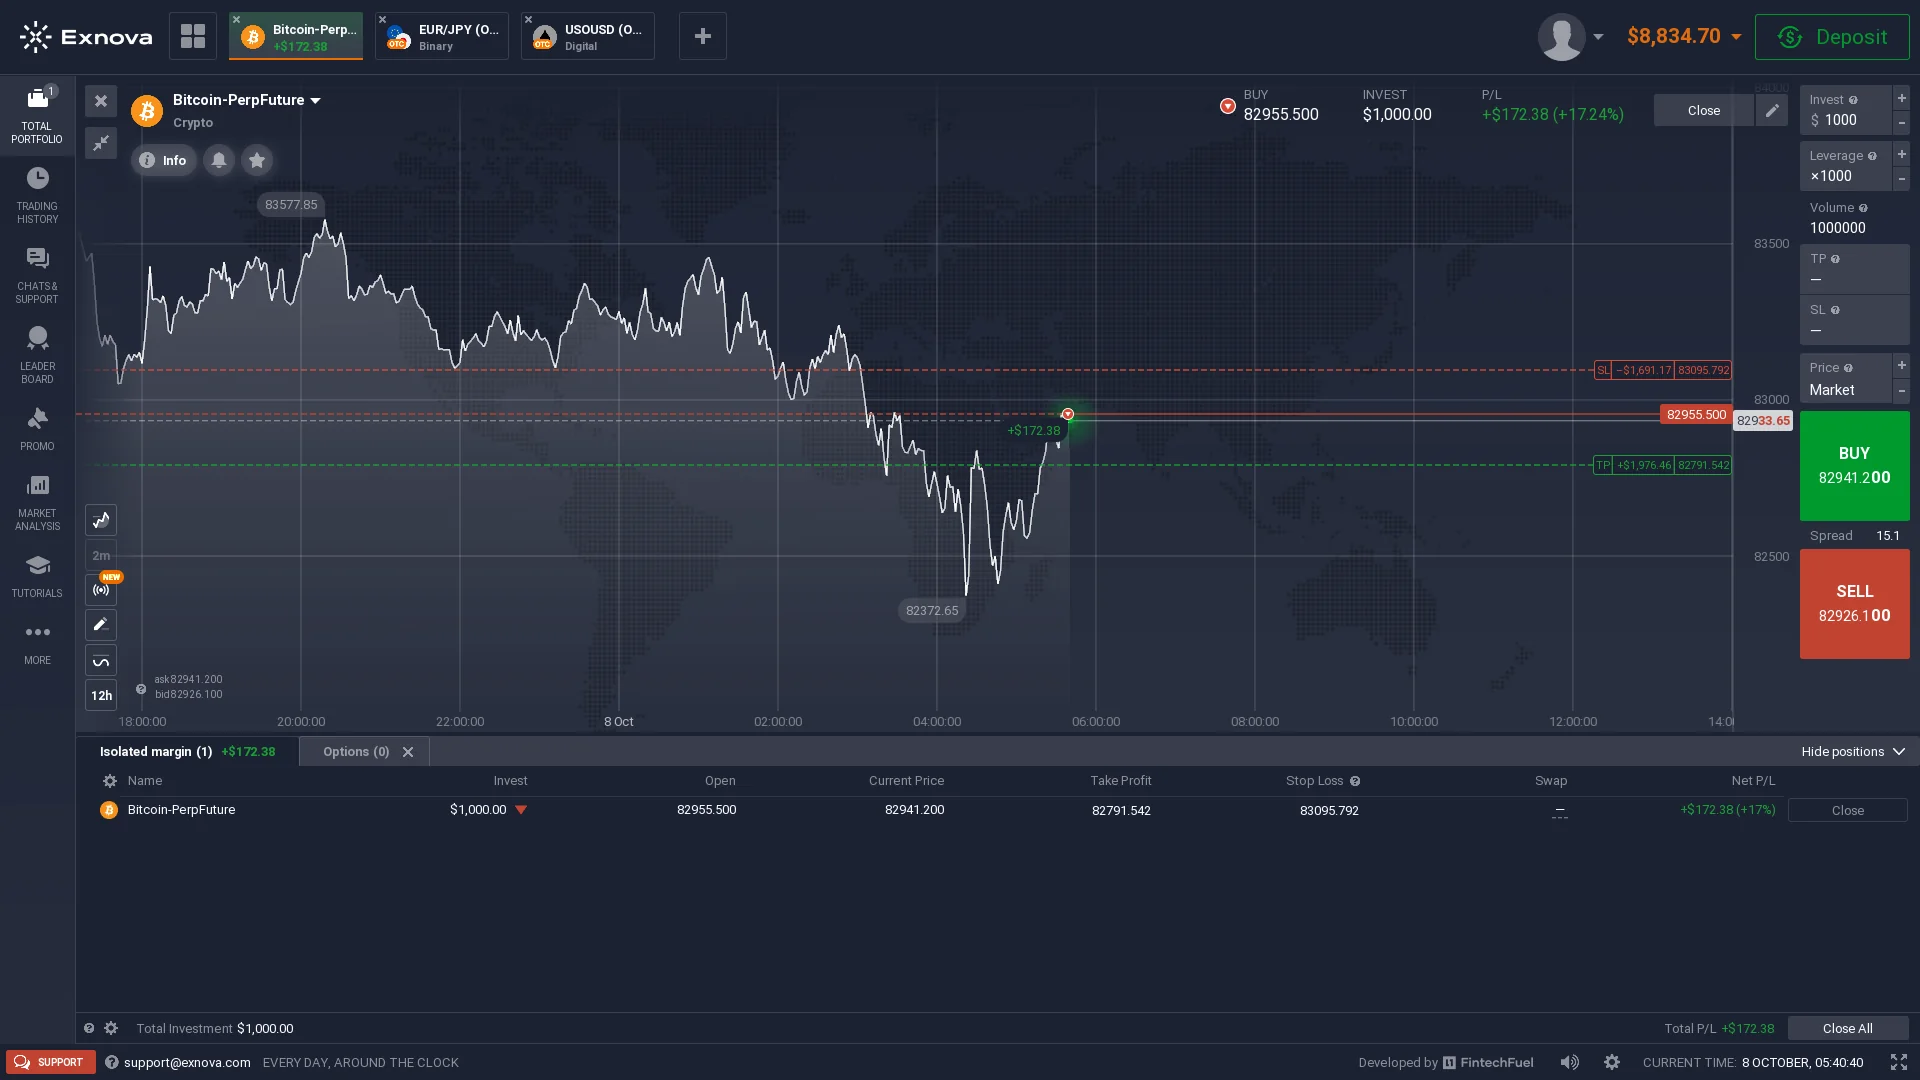
For Margin, start by identifying the asset, then read the exposure and leverage shown on the order panel. If you are inspecting an already opened position, the position-management controls and its P/L are more relevant than an Options expiration timer. The leverage value visible in a saved screen describes that example, not a universal default or a suggested setting.
The practical takeaway: the mode changes the trade mechanics. Before moving from an option to Margin, re-check the order size, possible exit controls and what constitutes a closed position. This is also why an Exnova demo session is useful for exploring the interface without confusing the two product families.
Start the Exnova Demo and Switch Balances
Exnova advertises a free $10,000 virtual practice balance for registered accounts. It is a workspace for testing controls and exploring instruments; it is not a $10,000 cash deposit and cannot be treated as withdrawable funds. You can get started with the practice side without funding a real-money account.
From account creation to the practice screen
- Follow the Exnova platform route and choose the registration option if you do not yet have an account.
- Complete the account form presented by Exnova and enter the trading room.
- Find the balance selector and choose the practice or demo balance rather than the real balance.
- Open the mode selector, choose Digital, Binary, Blitz or Margin, and inspect the controls available in that practice environment.
A useful first demo task is not to guess where an asset will move. Check whether you can find the same symbol under two different products, how the ticket changes, and where the platform displays an open position or completed trade. Those actions help you learn the workspace before choosing what to do next.
Practice versus real: the balance selector is the place to confirm which account funds are currently active. Switching a chart or product tab does not by itself confirm a switch between demo and real funds. Always read the active balance label.
Exnova Login, Account Creation and Recovery
The sign-in screen and registration flow do different jobs. Sign Up creates a new Exnova account; Sign In opens an existing one. If you already registered, repeatedly submitting a new-registration form will not solve a forgotten password.
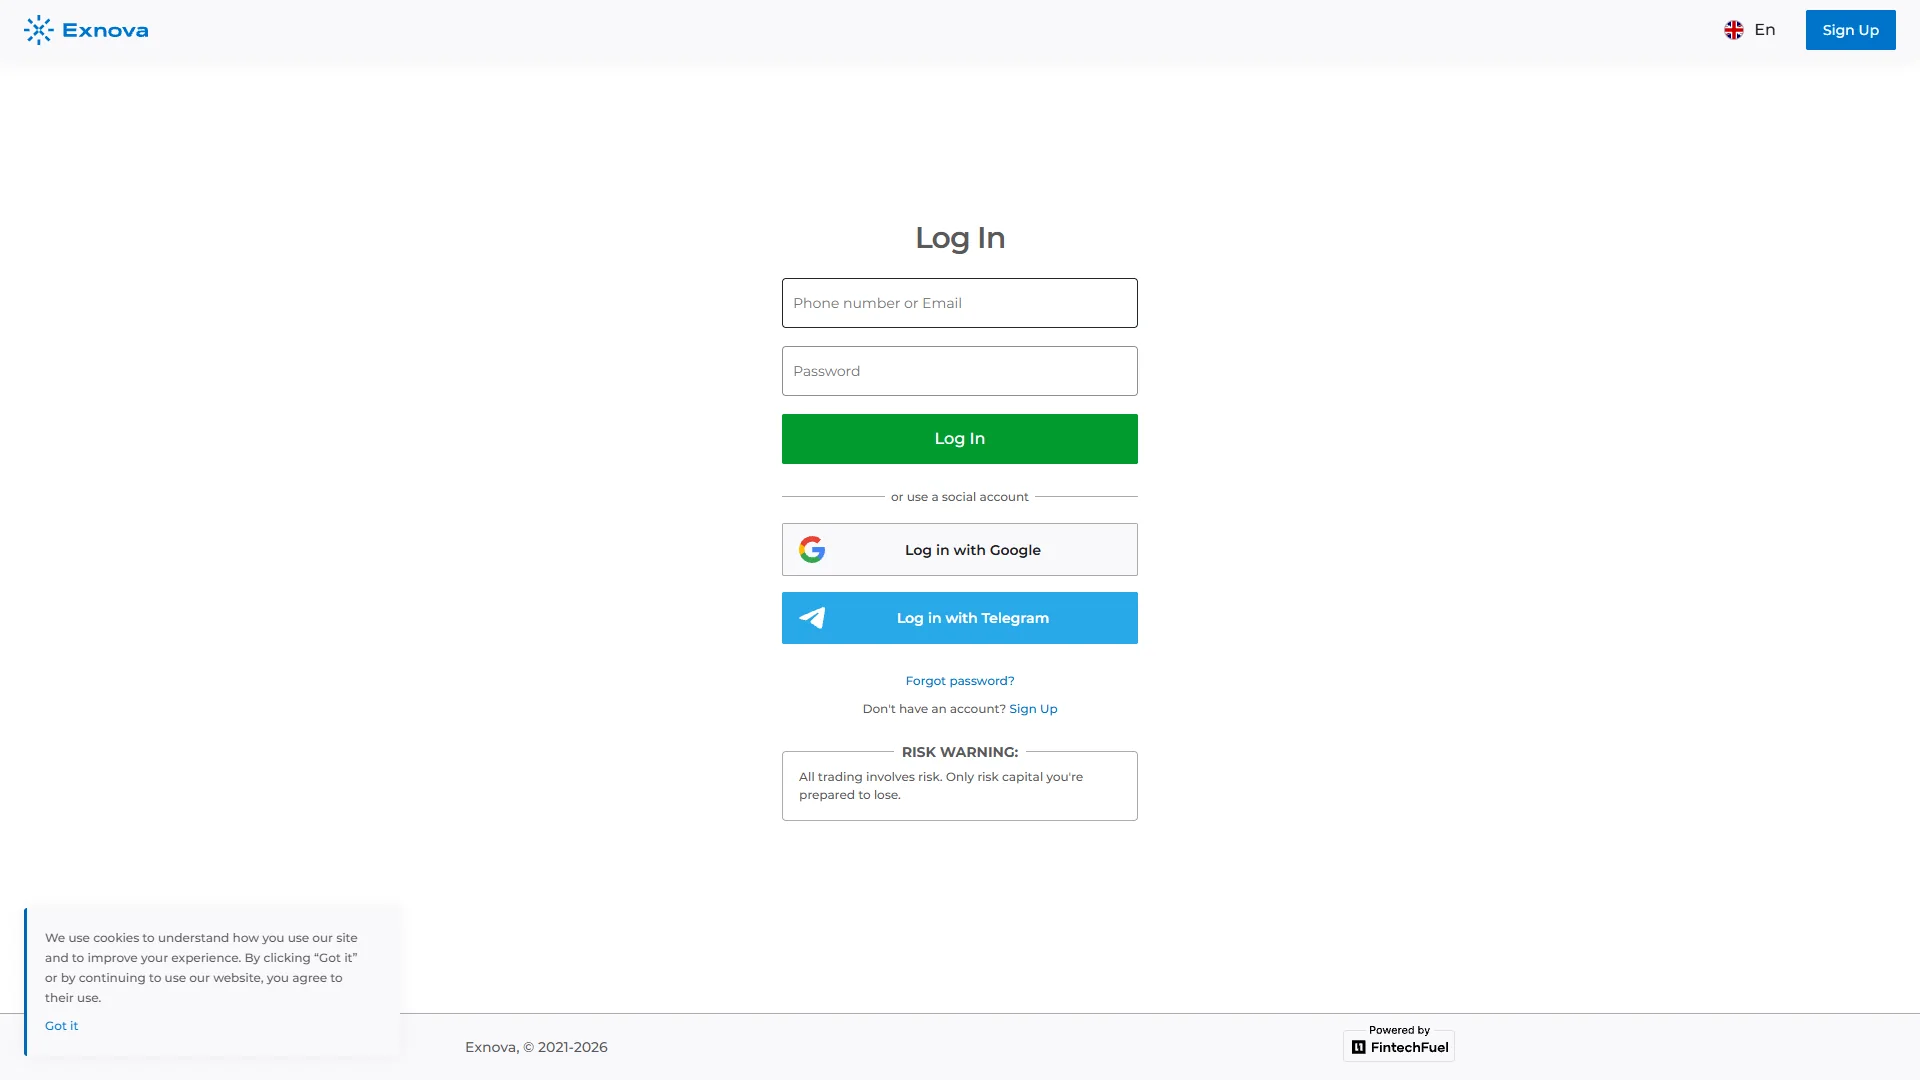
For an existing account, open the platform through the account route, select Sign In, enter the account credentials and continue to the trading area. If the password is missing, use the password recovery option displayed on the actual login screen. Follow the recovery instructions rather than creating a second account just to reach the demo.
Exnova registration: from Sign Up to the demo
To create an Exnova account, use the registration form rather than the sign-in window pictured above. The steps connect the new-account form to the same practice balance covered earlier:
- Open the Exnova platform through the button at the top of this guide and select Sign Up or Create an Account.
- Enter your email address and create a password. Select your country of residence if the form asks for it.
- Review the account terms, tick the required consent box and submit the registration form.
- Follow any email-confirmation or account-setup prompt that appears, then enter the trading room.
- Open the balance selector and choose the $10,000 virtual demo balance. You can then open Digital, Binary, Blitz or Margin from the product selector.
The login image on this page shows the real platform screen for orientation. BrokerOption does not collect Exnova account credentials and does not provide a substitute login form. All sign-in and registration actions happen on Exnova's account route.
Find Assets and Change Chart Views
A symbol is only useful after you know which product list you are searching. Exnova's asset finder is organized around trading categories, and the recorded selector includes separate Options and Margin areas. Search for the asset inside the product you chose, then verify the full instrument name on the ticket before reading its available settings.
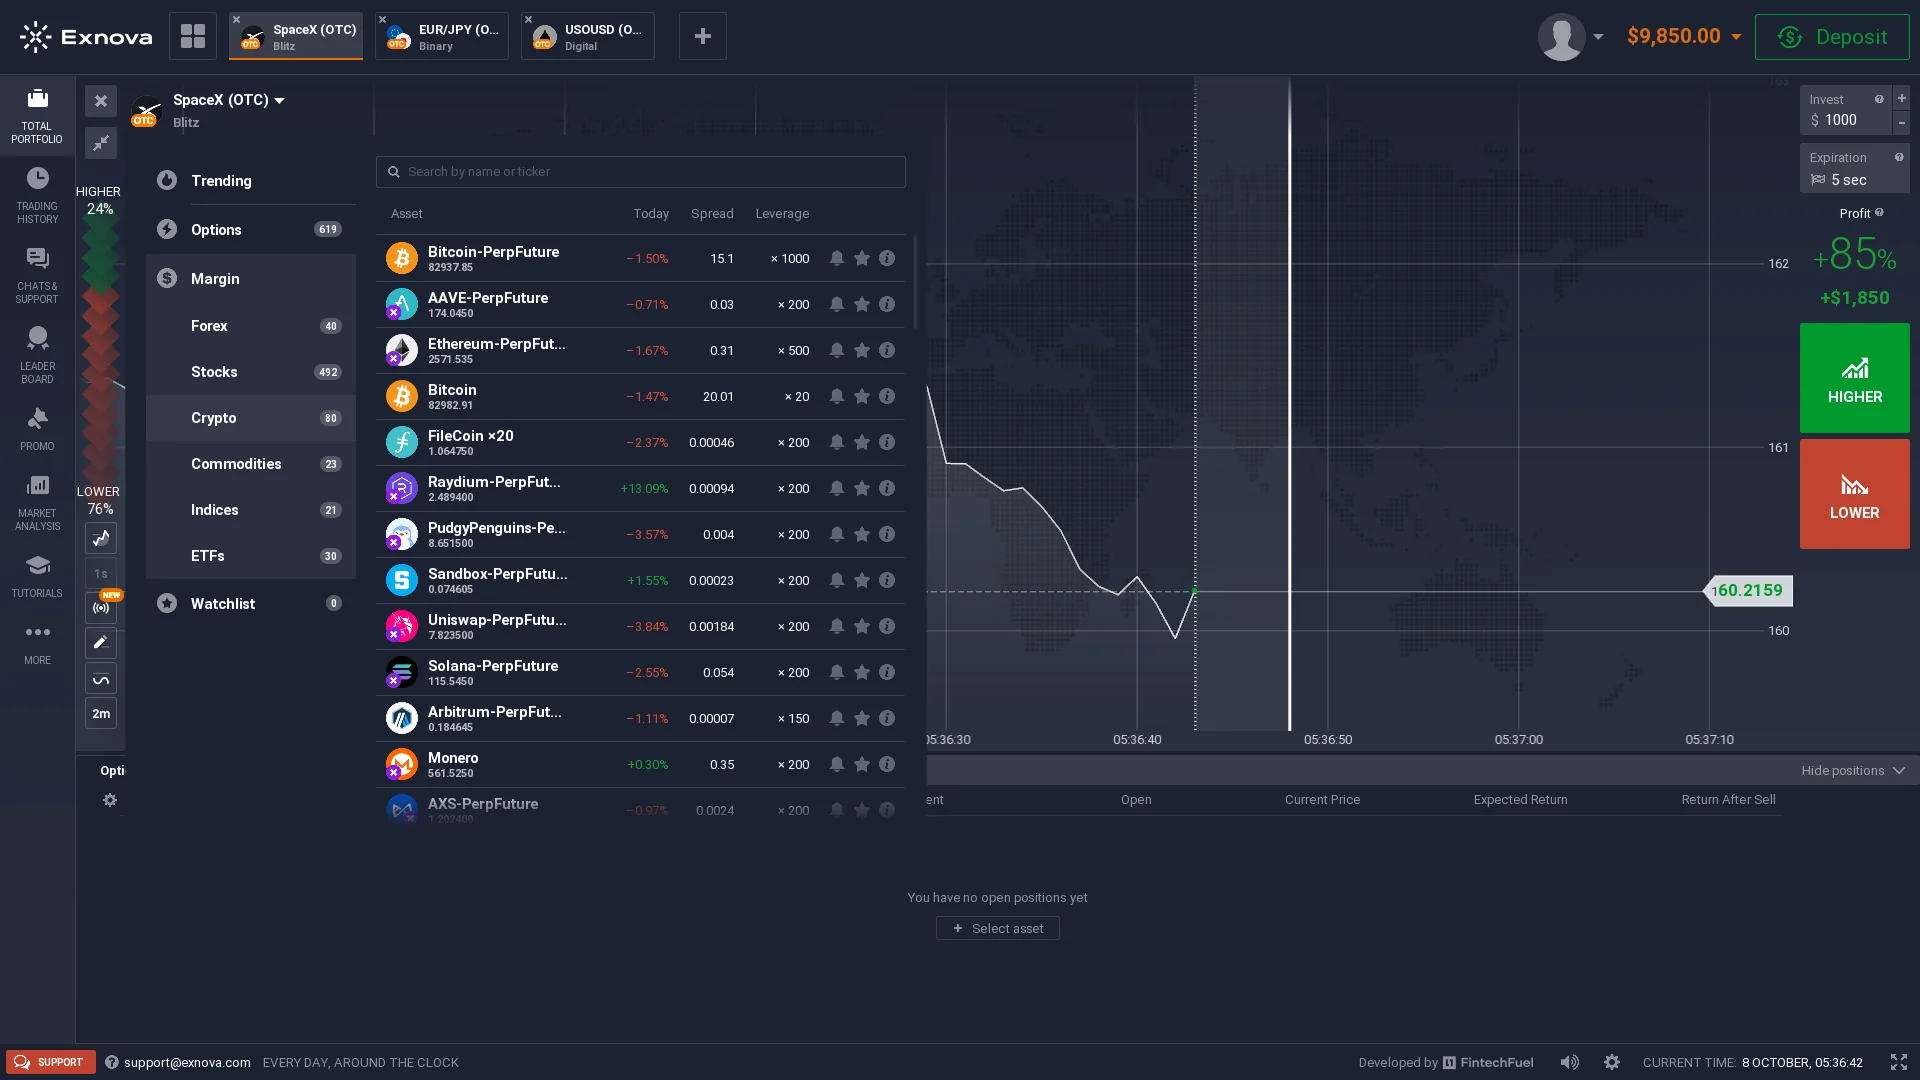
For example, a currency pair marked OTC should be read as that labeled instrument, not silently treated as an identical exchange-traded price feed. Similarly, a cryptocurrency instrument under Margin can have position controls that do not exist for the option version of a market.
Once the right asset is open, adjust the chart's time range or display tools to suit the question you are asking. On Digital, the Nearest Strike / Current Price dialog changes how reference prices are presented; the accepted contract fields still need to be read separately. A useful screen check is simple: select the product, find the instrument, inspect its ticket, and only then customize the chart.
Deposit From $10: Methods and Payment Networks
Exnova's published starting figures are $10 for a real-money deposit and $1 for a trade. These refer to different actions; the first is about putting funds into the account, the second about a possible ticket amount. The $10,000 demo balance remains virtual and does not require a deposit to explore.
To reach the payment choices, enter the account, check that you are looking at the real balance, and open the deposit or cashier area. The saved Exnova payment screen displays card options, Binance Pay and cryptocurrency methods. It is a snapshot of available methods in that session, so the current account screen is the place to check what is actually offered for your location and currency.
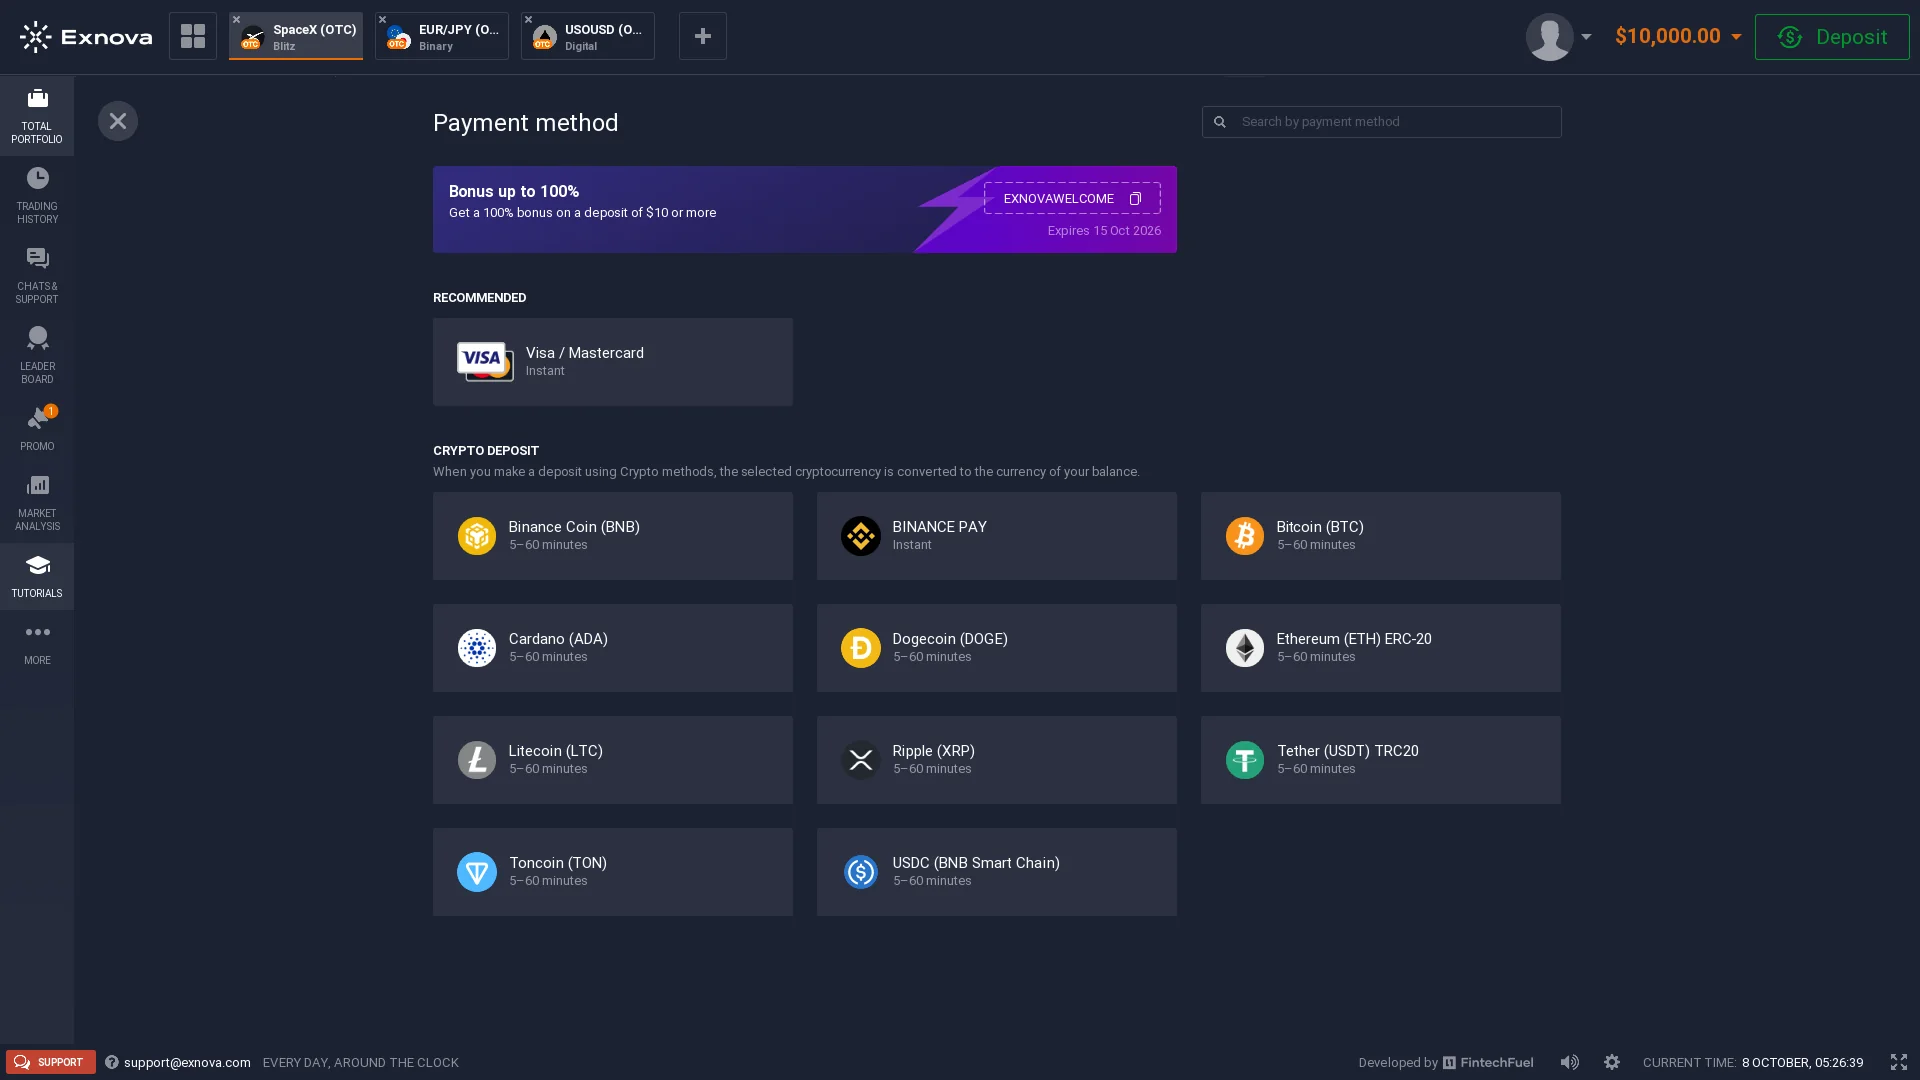
If you choose a cryptocurrency method
Pay attention to the network as well as the asset. An original Exnova payment screen shows a USDT / TRC20 route. TRC20 is a network selection, not a general label for all USDT transfers. The receiving address, any reference information and the selected chain must correspond to the instructions in the live cashier; don't reuse a screenshot's old deposit details.
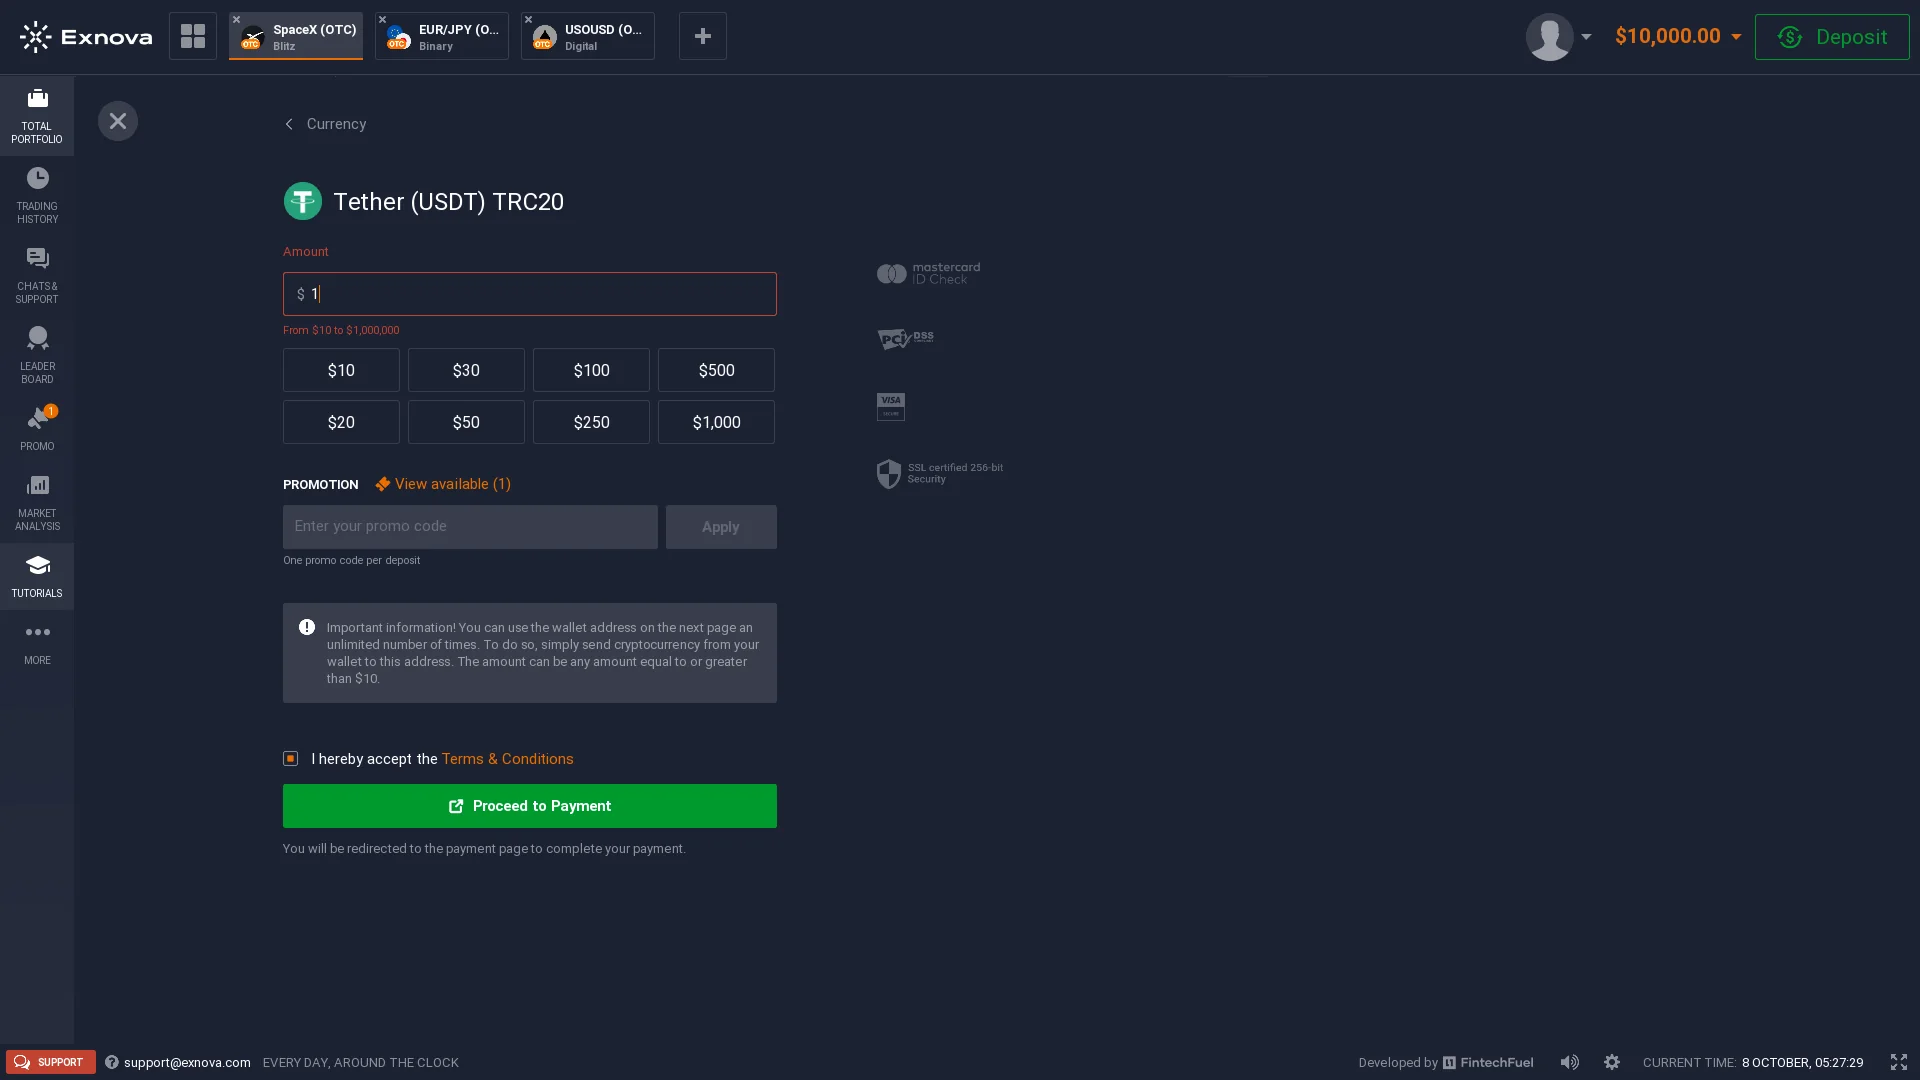
The screenshots illustrate the payment menu and network choice. They do not show a completed deposit or imply that every payment option is available to every account.
Verification and Withdrawal Navigation
Verification belongs to the account area, not to an options order ticket. In the recorded Exnova profile screen, the stages are separated into email, personal details and identity. Each stage has its own completion state, so a completed email step does not necessarily mean that all account checks are finished.
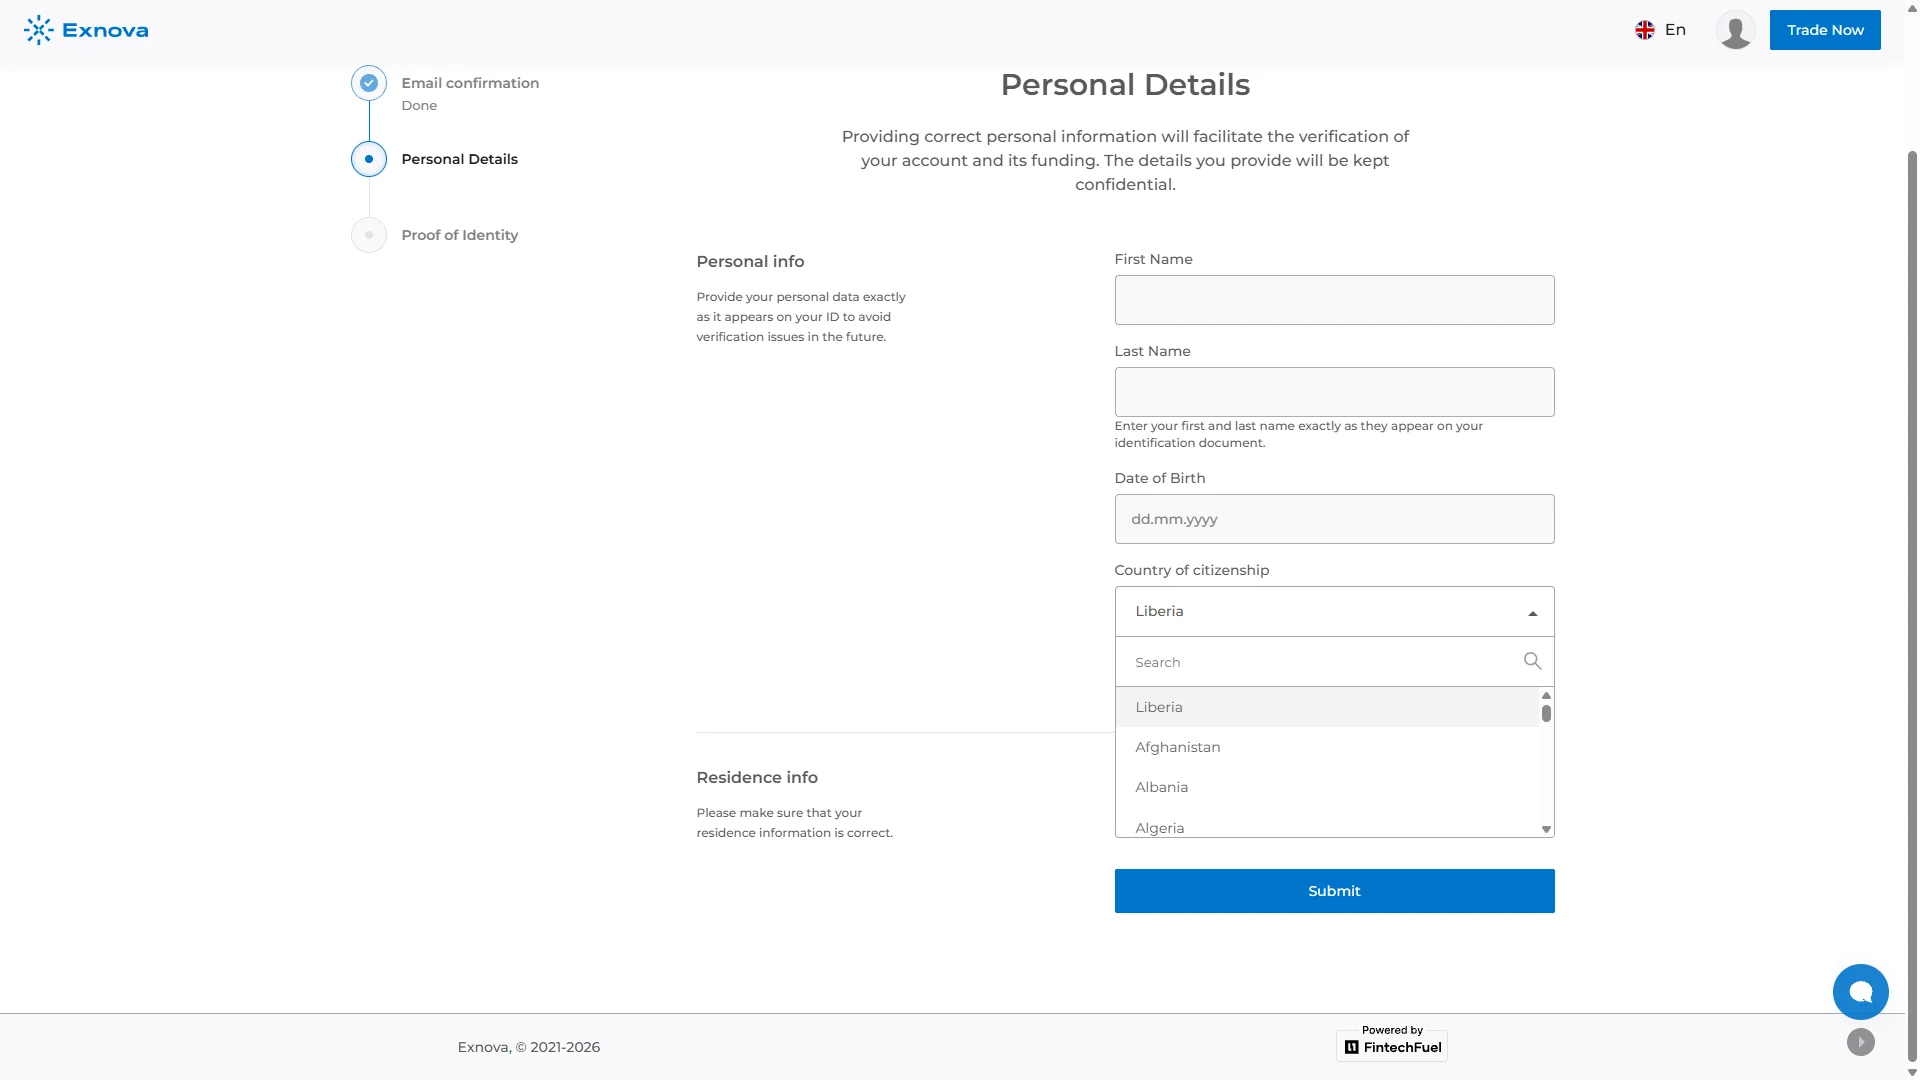
If you need to finish verification, open the profile or account settings, check which item still needs attention, and follow the identity upload or verification flow displayed there. The next screen may request an identity document or move into a dedicated verification provider's interface; follow the account's current instructions rather than assuming a fixed document sequence.
To find a withdrawal request, switch from the trading panel to the platform's cashier or payment area. Review the withdrawal method shown for your account, enter the requested details and use the request/history area to check its status. Available methods, processing requirements and timing can vary; the current cashier screen is the authoritative place for the details of that request.
This distinction matters operationally: the profile tells you what is verified, while the cashier tells you what payment action is available. You can navigate both areas without treating an interface screenshot as evidence that a particular payout has completed.
Open Exnova in a Browser or Android App
Exnova can be accessed through a desktop browser without installing a separate trading terminal. For Android, the Google Play listing identifies the app as Exnova – Mobile Trading App from Digital Smart LLC, using package identifier com.exnova. The listing describes access to both practice and real accounts.
If you prefer Android, locate that app in Google Play and check its developer and package information before installing. Use the same registered account credentials to sign in, then confirm the selected balance and product in the mobile layout. If you are on a desktop or a phone without the app, the browser route remains an alternative.
The main controls are the same decisions in a tighter space: which balance is active, which product is selected, which asset is open, and what the order panel says. Mobile navigation may move these controls into menus, so check the current interface rather than searching for the exact desktop button position. Avoid unrelated APK mirrors when the verified store listing is available.
Exnova FAQ: Questions About Modes and Accounts
How do I find Digital, Binary, Blitz and Margin in Exnova?
Open the instrument selector in the trading room. The Options area contains product tabs such as Digital, Binary and Blitz, while Margin has its own product area. Choose the product first, then check which assets are available inside it.
Is Purchase Time the same as Expiration on a Digital option?
No. Purchase Time is the remaining window for opening that contract. Expiration is when the contract is scheduled to settle. Check both clocks before reading the Higher or Lower ticket.
What does Return After Sell show while a Digital position is open?
It is the displayed amount associated with selling an open position early, when early sale is available. It can differ from Expected Return at expiry and can change while the position is open.
Does Blitz always offer a five-second expiry?
No. A saved Exnova Blitz screen shows a five-second setting for EUR/USD OTC, but available durations depend on the instrument and current platform options. Use the duration shown on your own ticket.
Can I use the Exnova demo before making a deposit?
Yes. Exnova advertises a $10,000 virtual practice balance after account registration. You do not need to make a real-money deposit to explore the practice workspace.
How can I sign in to an existing Exnova account?
Open the Exnova account route, select Sign In rather than Sign Up, and enter the credentials associated with your account. If you cannot remember the password, use the recovery link on the sign-in screen.
Is the $10 minimum deposit the same as the demo balance?
No. The $10 figure is Exnova’s advertised starting real-money deposit; the $10,000 practice balance consists of virtual funds. Exnova also advertises trades starting at $1, subject to the selected instrument.
Where do I find account verification and withdrawal requests?
Use the account or profile area to review the email, personal-details and identity steps, then open the platform’s cashier or payment area for withdrawal requests and their status. Available methods and requirements are shown in the account.