Browser account walkthrough · ComforTrade
How ComforTrade Works: From Account Setup to Trade History
ComforTrade brings the account, chart, trade controls, instrument list and history into a browser workspace. This guide follows those screens in the order a new visitor is likely to use them: create an account, open Demo, understand the ticket, inspect completed trades and find the cashier when needed.
The illustrations below document an English-language interface session; the assets, displayed payout rates and account values can change.
The ComforTrade Browser Workspace at a Glance
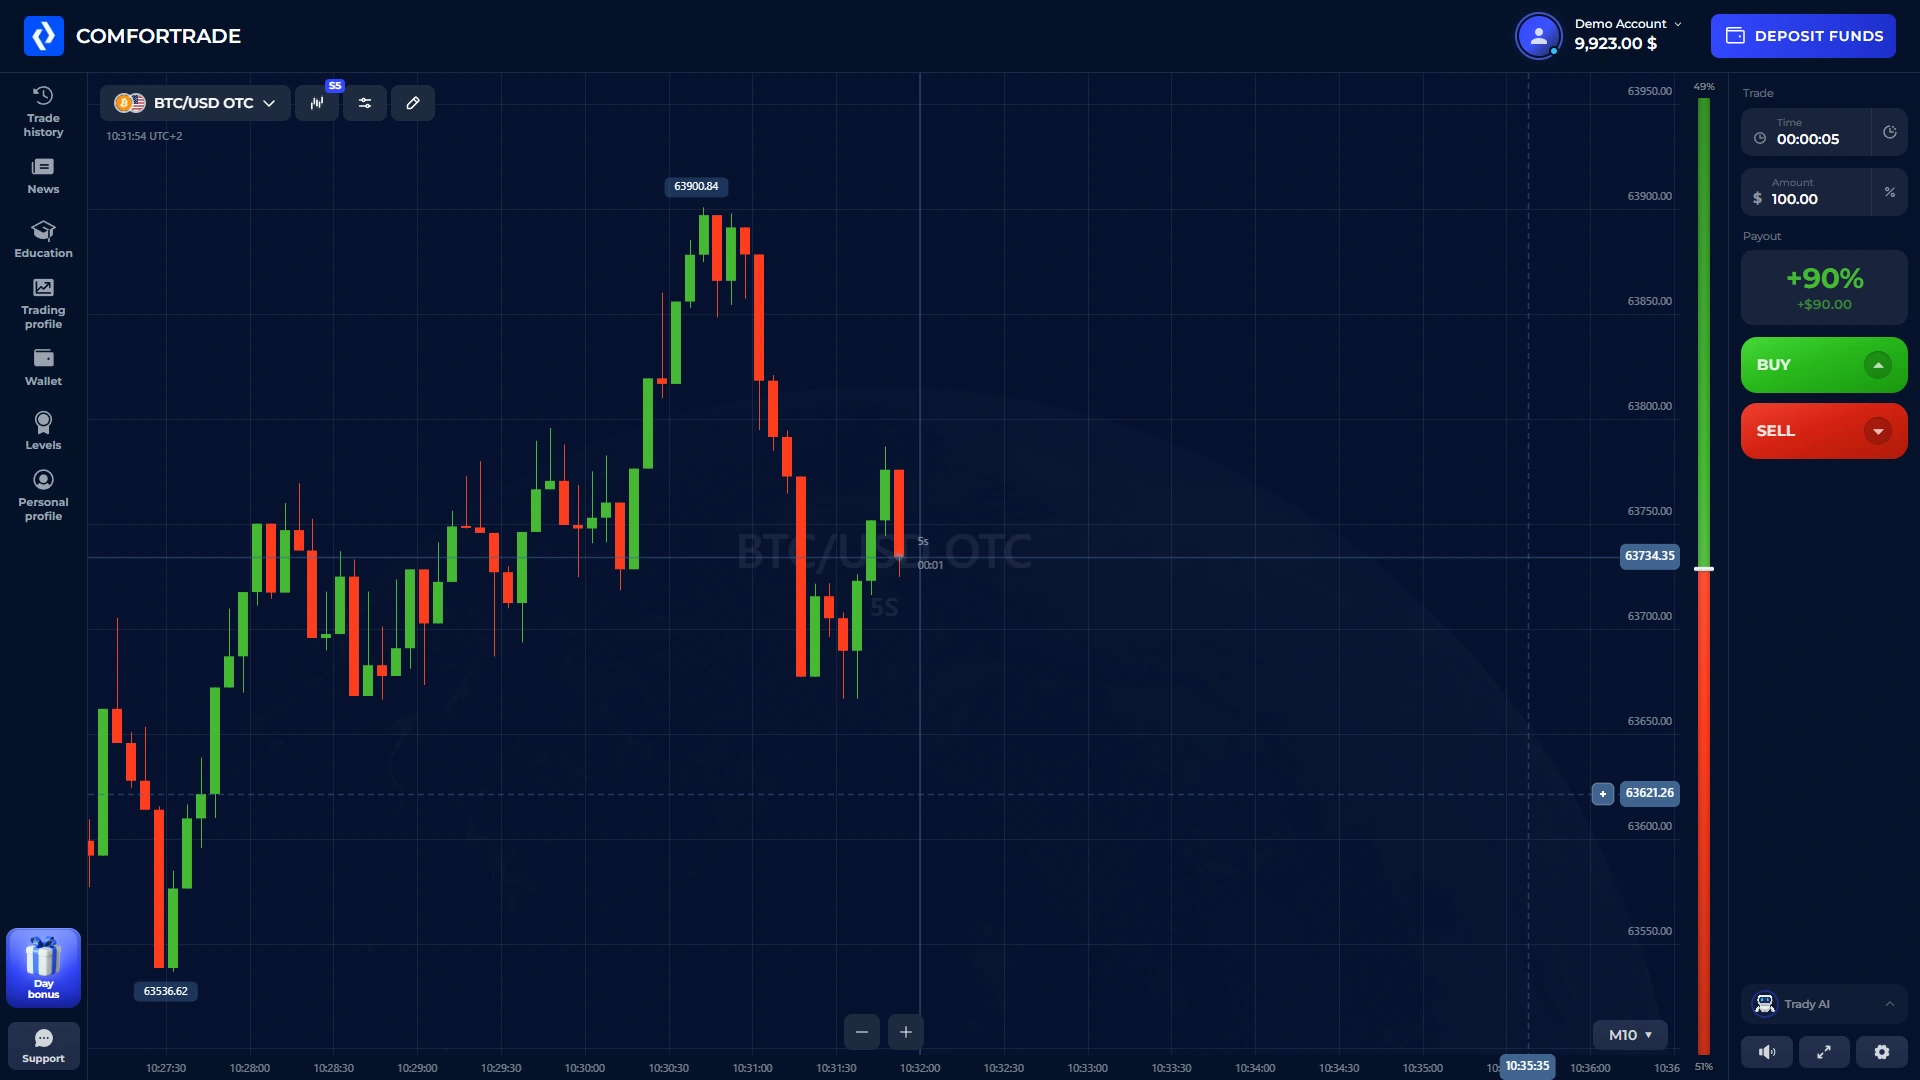
The first screen is easier to understand as a map than as a list of features. The centre is the price chart. Above or beside it you can find the current instrument and chart tools. The order panel sits to the right on a desktop layout, while account navigation and balance information occupy their own areas. The green BUY and red SELL controls belong to the order ticket; they are not instructions from this guide to take a particular direction.
Before interacting with a trade, check three labels: the account type, the instrument and the trade amount. A familiar-looking chart can still be connected to a different balance or asset from the one you intended. The screenshot shows the layout, not the currently available trading conditions for every visitor.
ComforTrade is presented as a web-based account rather than something that requires a desktop installation. Its chart, trading and account functions are linked, but they answer different questions: the chart displays price movement, the ticket sets contract parameters, and Trade History records what happened to earlier contracts. For a separate perspective on ComforTrade, readers can visit the independent comfortrade website. This walkthrough focuses on the controls visible in our recorded English browser session.
A useful first visit does not require placing a paid trade. Open the Demo workspace, find the controls described below and learn which screen contains the information you will need later.
Registration, Login and the First Demo Session
There are two different journeys here. A new visitor needs the registration form; a returning user needs the sign-in form for an existing account. They should not be treated as interchangeable buttons, and neither requires a separate article on this website.
Create an account
- Open the trading platform using the ComforTrade button on this page and choose Create Account or the registration option shown.
- Enter an email address you can access and create a password. The operator's getting-started instructions identify these as the core sign-up details.
- Review and accept the account terms in the form, then submit the registration.
- Follow any verification or confirmation instructions shown for your account. Account requirements may differ depending on the person and available services.
- Once the workspace opens, select Demo and check that the balance is virtual before exploring instruments or testing ticket settings.
The operator describes Demo as available after registration, without an initial deposit. That is different from a no-registration guest demo. You may see a practice balance immediately after the account is set up, but a specific starting amount should be checked in your own account rather than inferred from someone else's screenshot.
Return to an existing account
If you have already registered, choose the login or sign-in route rather than opening another profile. Enter the credentials for that account and complete any authentication step the platform requests. If access fails, first check the email used to register, your keyboard layout and whether the browser is trying to autofill an unrelated account. Use the recovery route displayed by the service instead of creating duplicate accounts: the operator's agreement restricts multiple client profiles.
Choose Demo before funding
Read the balance selector carefully. Demo is for virtual trades; Real concerns actual account funds. If the screen shows a real balance, switch to the virtual workspace before following the examples in this guide. Practising with an order ticket is useful for learning the controls, but virtual outcomes do not establish how a person will perform with deposited money.
Setting Up a Trade: Asset, Time, Amount and Direction
The order ticket is where a general chart becomes a specific contract. In the English desktop capture, the right-hand panel displays a time field, an investment amount and a highlighted payout percentage above the BUY and SELL controls. These controls should be read together; looking only at the green or red button leaves out the settings that determine the trade.
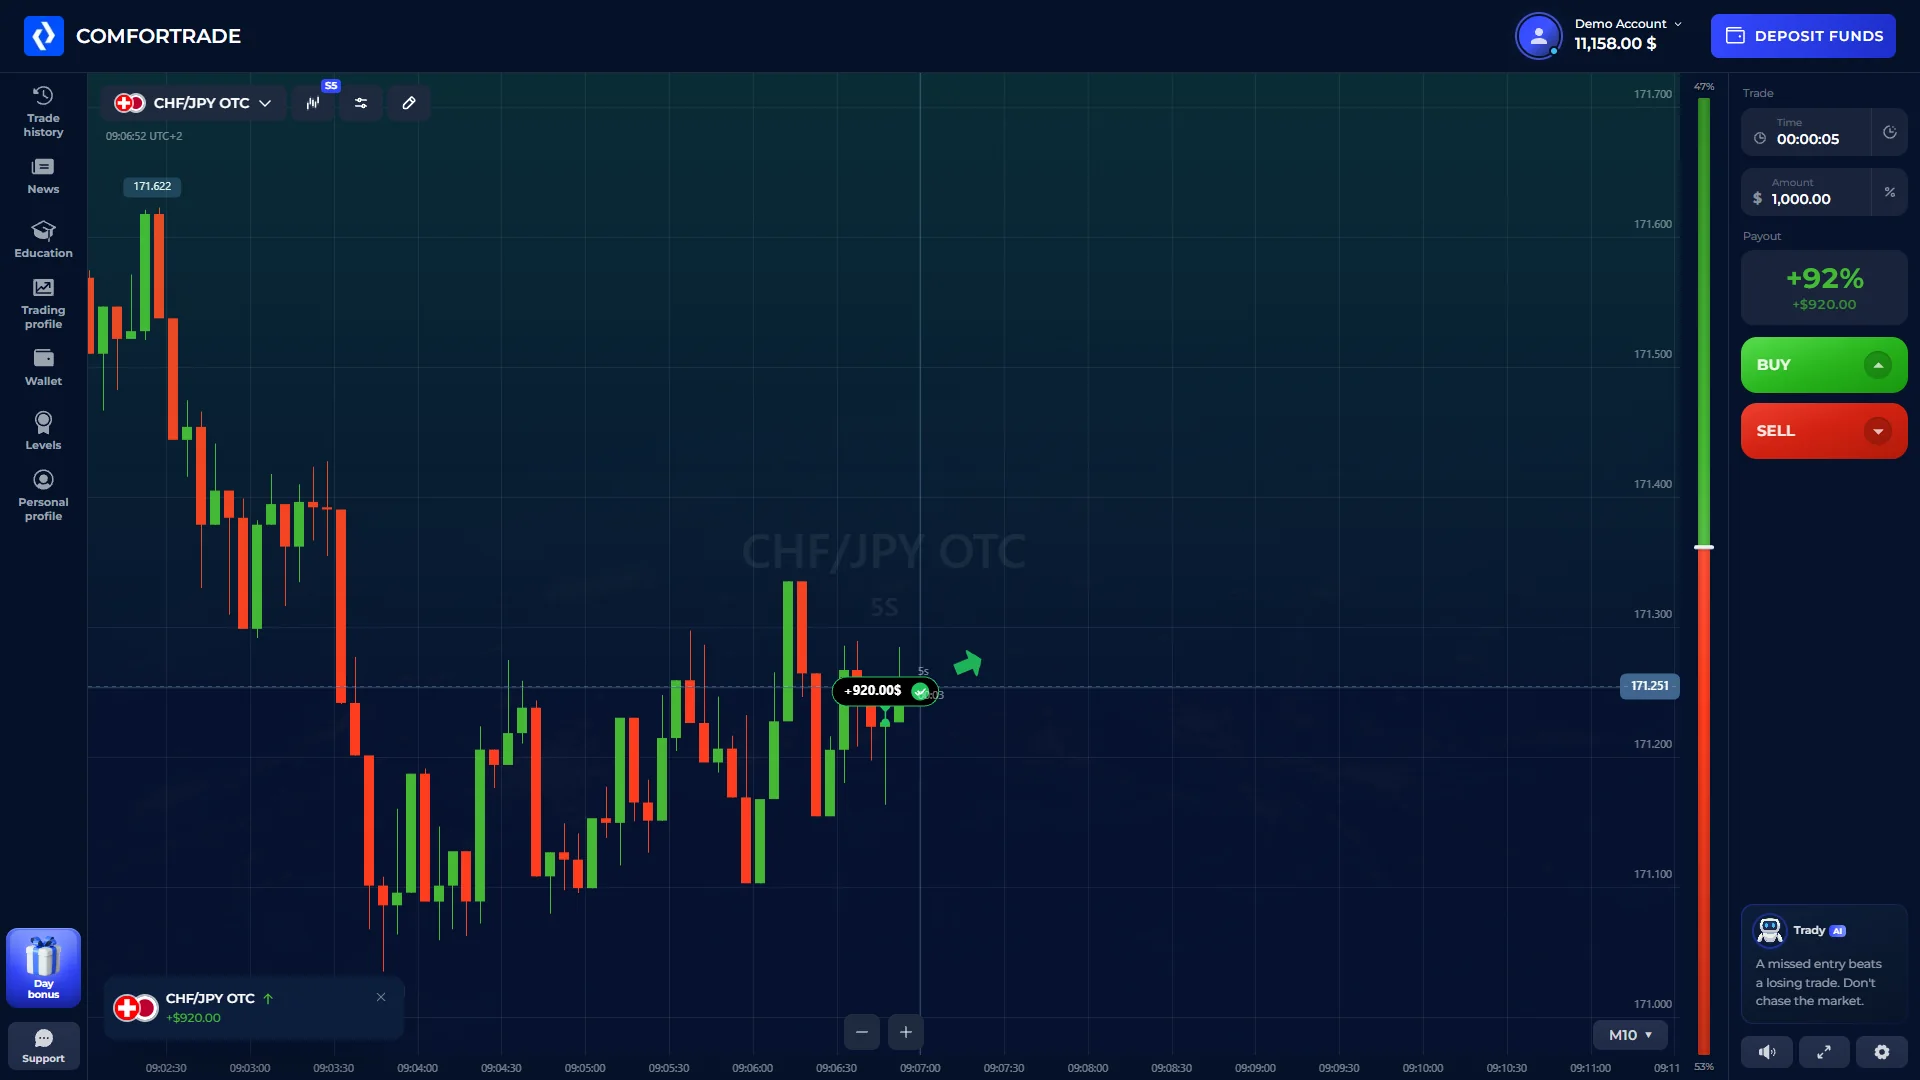
Instrument: the active market name appears close to the chart. It tells you which price series and contract the ticket applies to. A currency pair with an OTC label is not automatically equivalent to a continuously traded market pair; inspect the current instrument designation.
Time: the ticket's duration or expiry setting determines when the contract is evaluated. That setting is not necessarily the same as the chart interval. A one-minute chart candle, for example, is a display setting; it should not be mistaken for the contract's settlement time. Check both values individually where the interface presents them.
Amount: the investment field defines the funds assigned to that contract. Do not confuse it with the account balance shown in the header or with the minimum deposit advertised for the cashier. Changing the amount changes the funds at risk for that one contract.
Direction: BUY indicates a rising-price choice and SELL a falling-price choice in the platform's getting-started description. The result is determined under the selected contract rules at expiration, not merely by the next candle's colour. Read the displayed return and ticket parameters before submitting. If you are learning the sequence, test each control in Demo rather than treating a screenshot as a trade signal.
Choosing Instruments and Reading Displayed Payouts
Opening the instrument picker changes what the chart and ticket are linked to. The saved English screen shows a scrollable list of currency pairs with OTC labels and payout percentages beside them. This is a selection menu, not a ranking of the safest or most profitable assets.
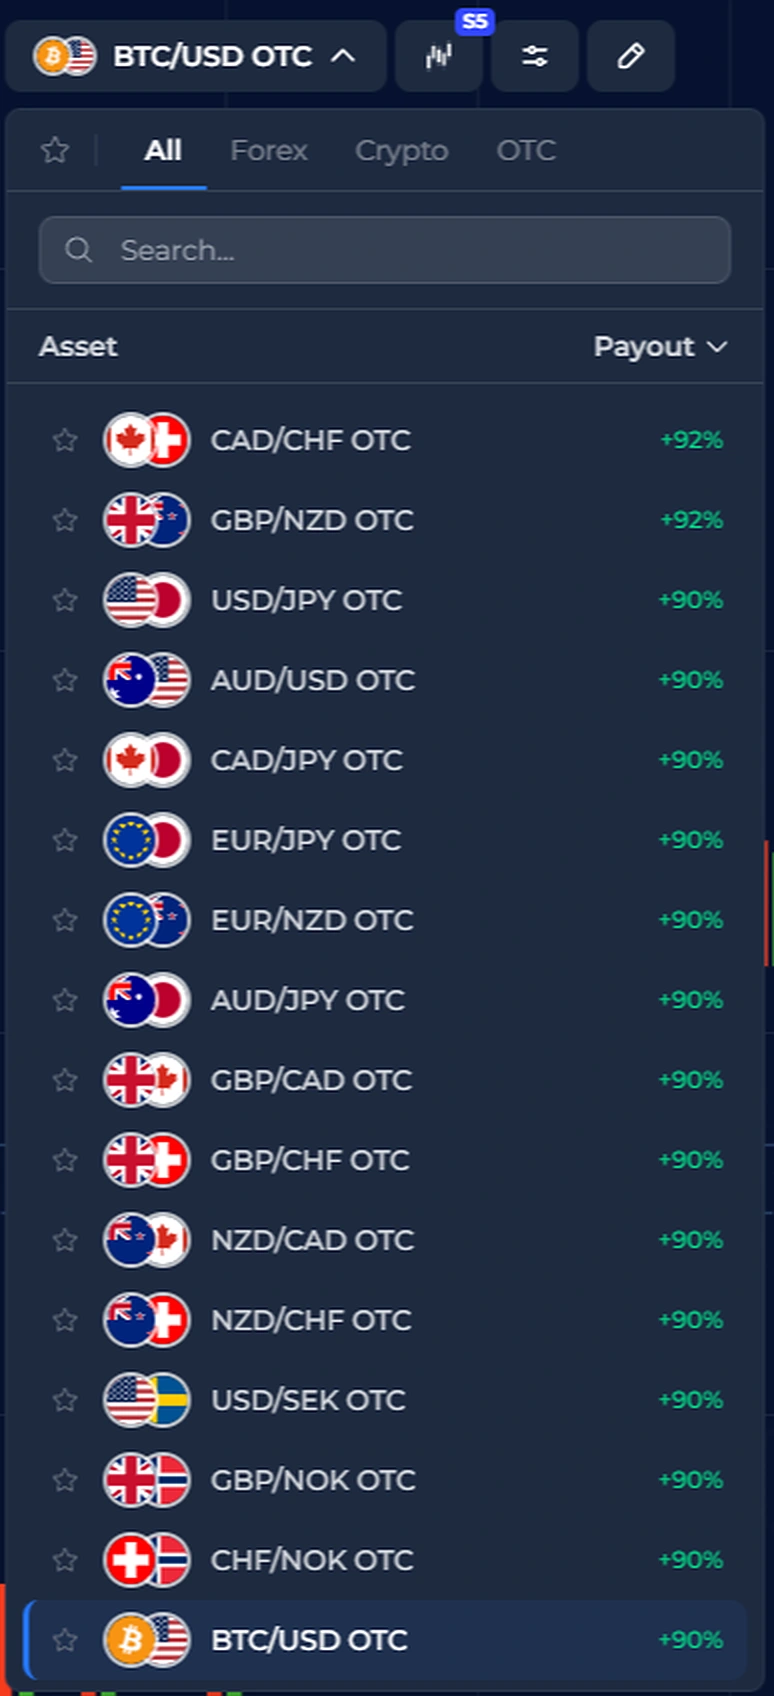
To use it deliberately, open the list, identify the complete instrument name, check whether an OTC suffix appears, and note the displayed payout before returning to the ticket. After switching assets, verify the symbol beside the chart again: the previous expiry or trade amount may remain visible even though the asset has changed.
A payout percentage is a term offered for a successful contract outcome, not the probability that a prediction will succeed. Nor is it a guarantee of net profit across a series of trades. ComforTrade advertises returns of up to 90% on some marketing pages, while an individual session can display different numbers. The number beside the asset and the one shown on the live ticket are more useful than any static percentage in an article.
Chart Indicators Without Leaving the Terminal
The platform includes chart tools in the same workspace as the trade ticket. In the English screenshot, an indicator menu is open over the chart, showing tools such as EMA, SMA, Bollinger Bands, RSI and Stochastic. The menu itself is useful evidence: you can look for a tool without leaving the chart for an unrelated settings page.
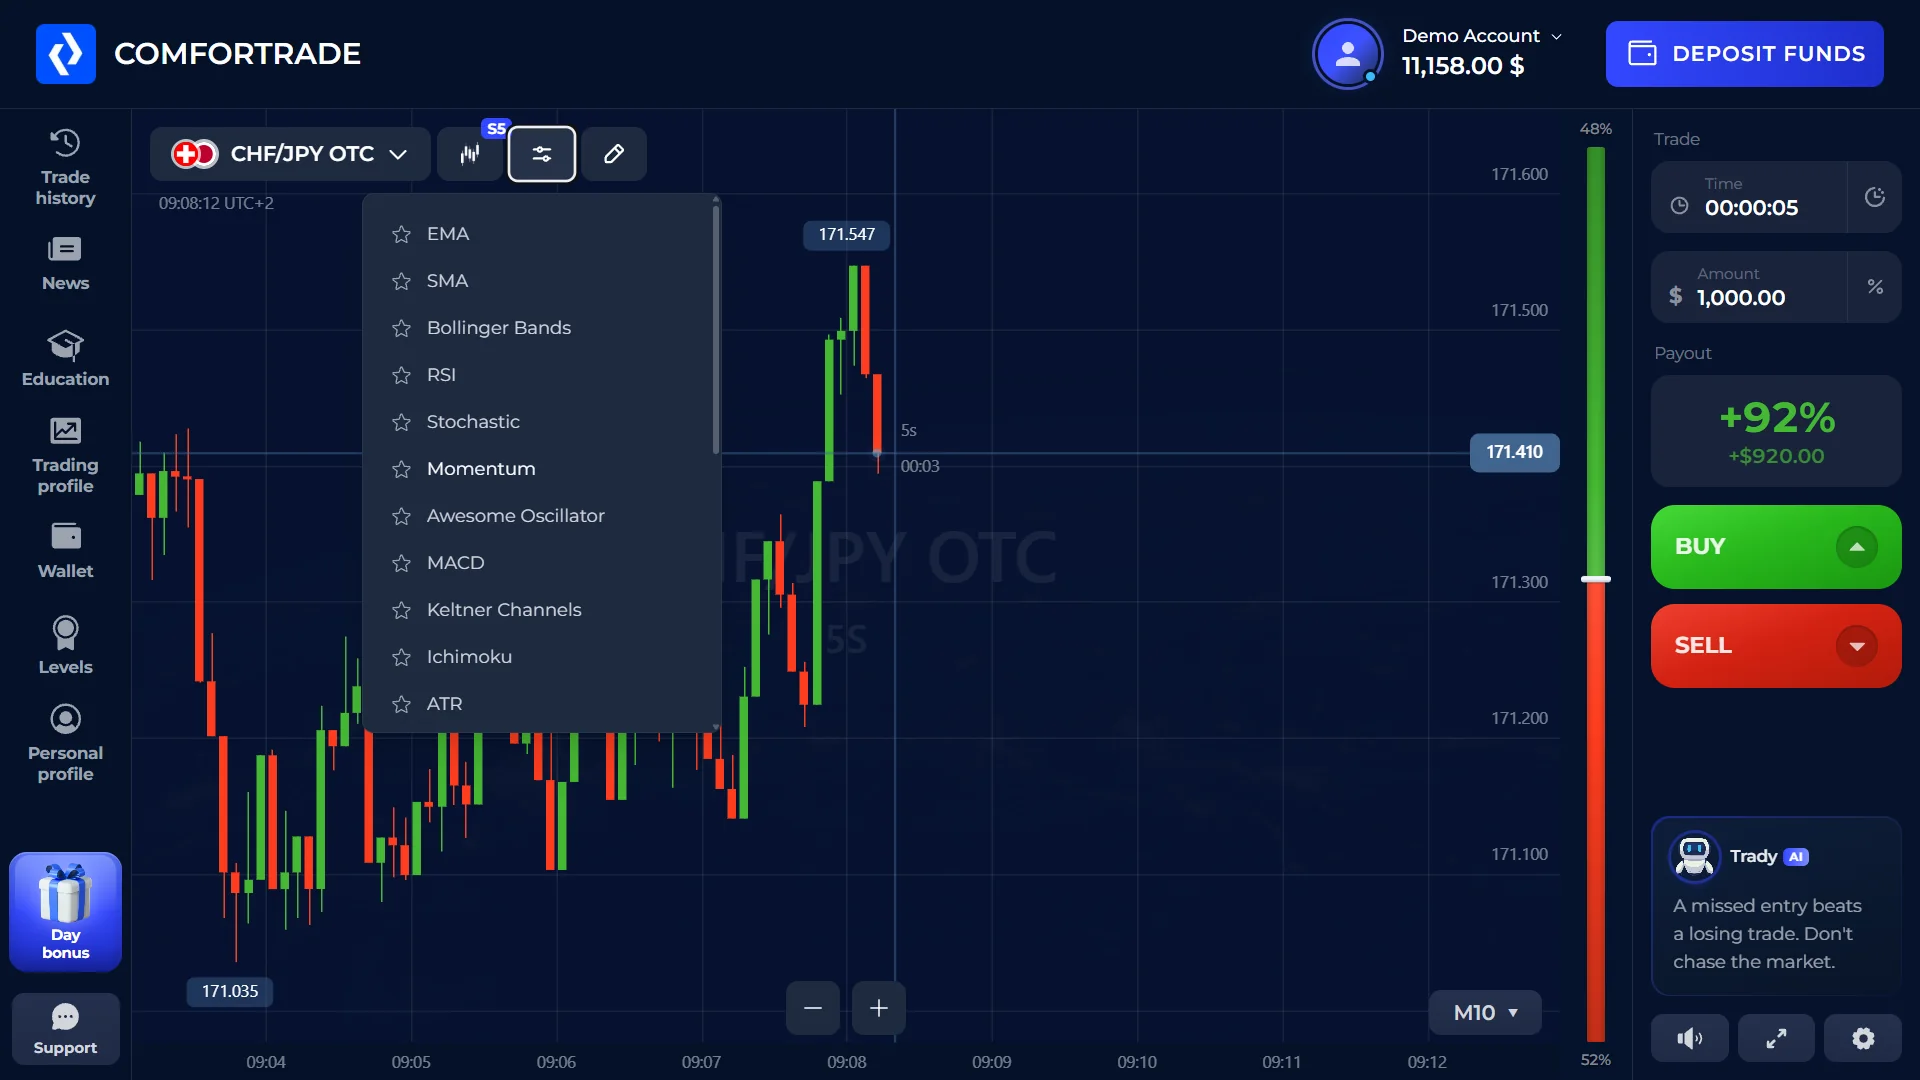
Start by locating the chart-tools icon near the instrument header. Open the indicator list, choose one tool and inspect how it appears on the price display. If the chart becomes difficult to read, remove or hide the overlay before choosing another. Stacking several indicators can produce more visual noise without adding clarity about what the contract will do.
These tools serve different descriptive purposes. A moving average smooths the historical price series; a band or oscillator uses another calculation of past prices. None changes the underlying contract, guarantees a direction or removes the possibility of losing the amount assigned to a trade. The practical goal of this section is to show where the tools live and how to keep the workspace readable, not to prescribe a winning strategy.
Where Completed Trades Appear in History
Trade History answers a question the chart alone cannot: what actually happened to a submitted contract? A candle may move, reverse or disappear from the visible chart window, but the history panel is where you review earlier trading activity. The saved English screen shows a panel with Open and Closed tabs alongside instrument rows and colour-coded results.
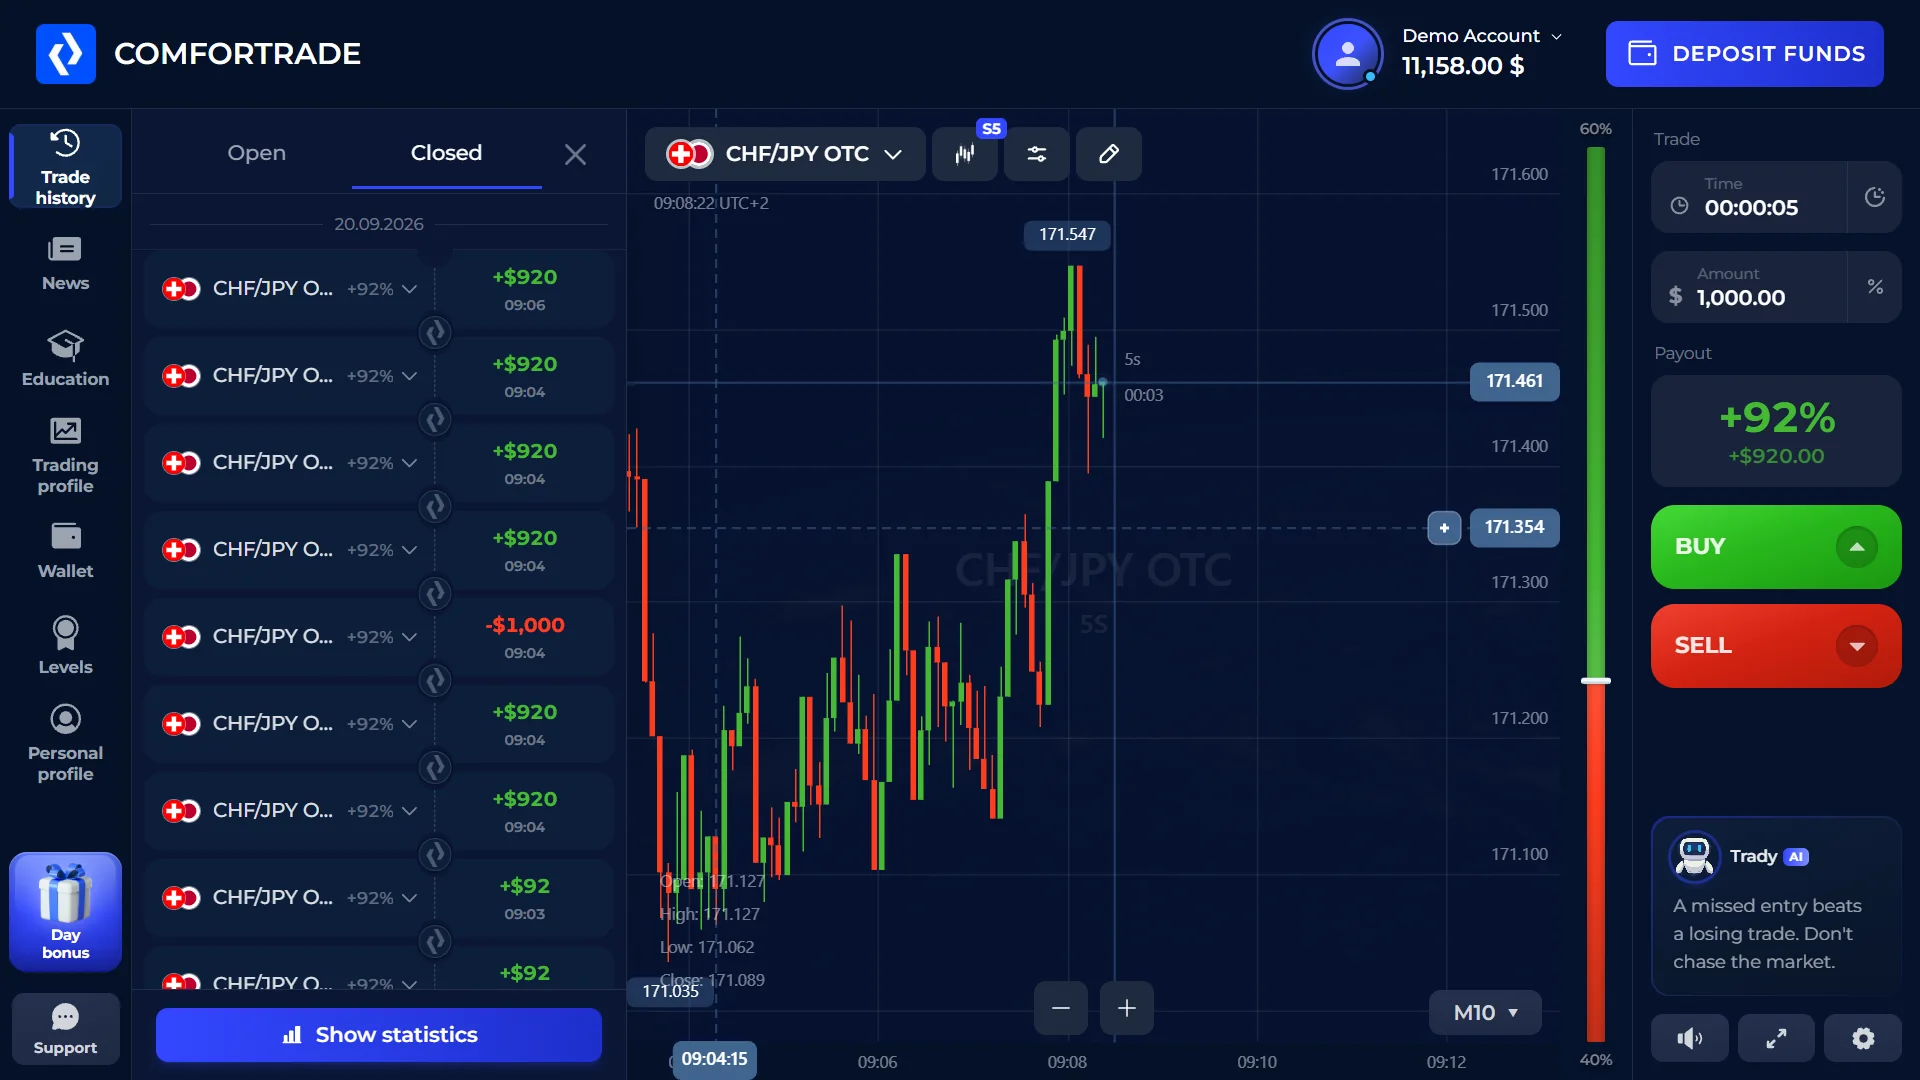
Open the trading-history area from the workspace navigation, then check which tab is active. Open is the natural place to inspect contracts that have not yet settled. Closed groups completed records and lets you review the visible instrument and outcome. If the panel provides an expandable row, use it to compare a particular result with the trade details that were selected.
For a clear record of what happened, look at the instrument label, the contract's timing, the assigned amount and the outcome rather than reading only the green or red number. A positive row does not establish long-term profitability, and a row shown in Demo does not represent a payout from a real-money account. History is useful both for finding an earlier action and for spotting mistakes such as using the wrong asset, duration or balance type.
When comparing screenshots or account sessions, first ask whether both are from the same account mode and instrument. This simple check prevents confusing a practice outcome with a real transaction or a settled trade with one still open.
Demo and Real Accounts: What Changes
ComforTrade makes a distinction between practicing in Demo and using funded account money. The chart layout and ticket may look similar in both. That visual similarity is convenient for learning navigation, but it also makes the balance label one of the most important details to check before acting.
In Demo, amounts and outcomes belong to the virtual environment. You can use it to locate the asset picker, experiment with chart indicators, see the time and investment fields and learn where closed contracts appear. A displayed practice balance is not withdrawable cash. Its size in our screenshot is not a promise of the starting Demo balance on every account.
In Real, deposited funds and operator account rules apply. Funding may involve payment-method limits, identity checks and jurisdictional eligibility. Do not switch modes solely because a demo run appears successful; the interface has taught you what buttons do, not how real-market outcomes will develop.
A useful final check before any order is a three-part confirmation: Demo or Real? Which asset? What investment amount? Those labels matter more than whether the chart resembles a screenshot from a guide.
Deposit, Withdrawal and Identity Checks
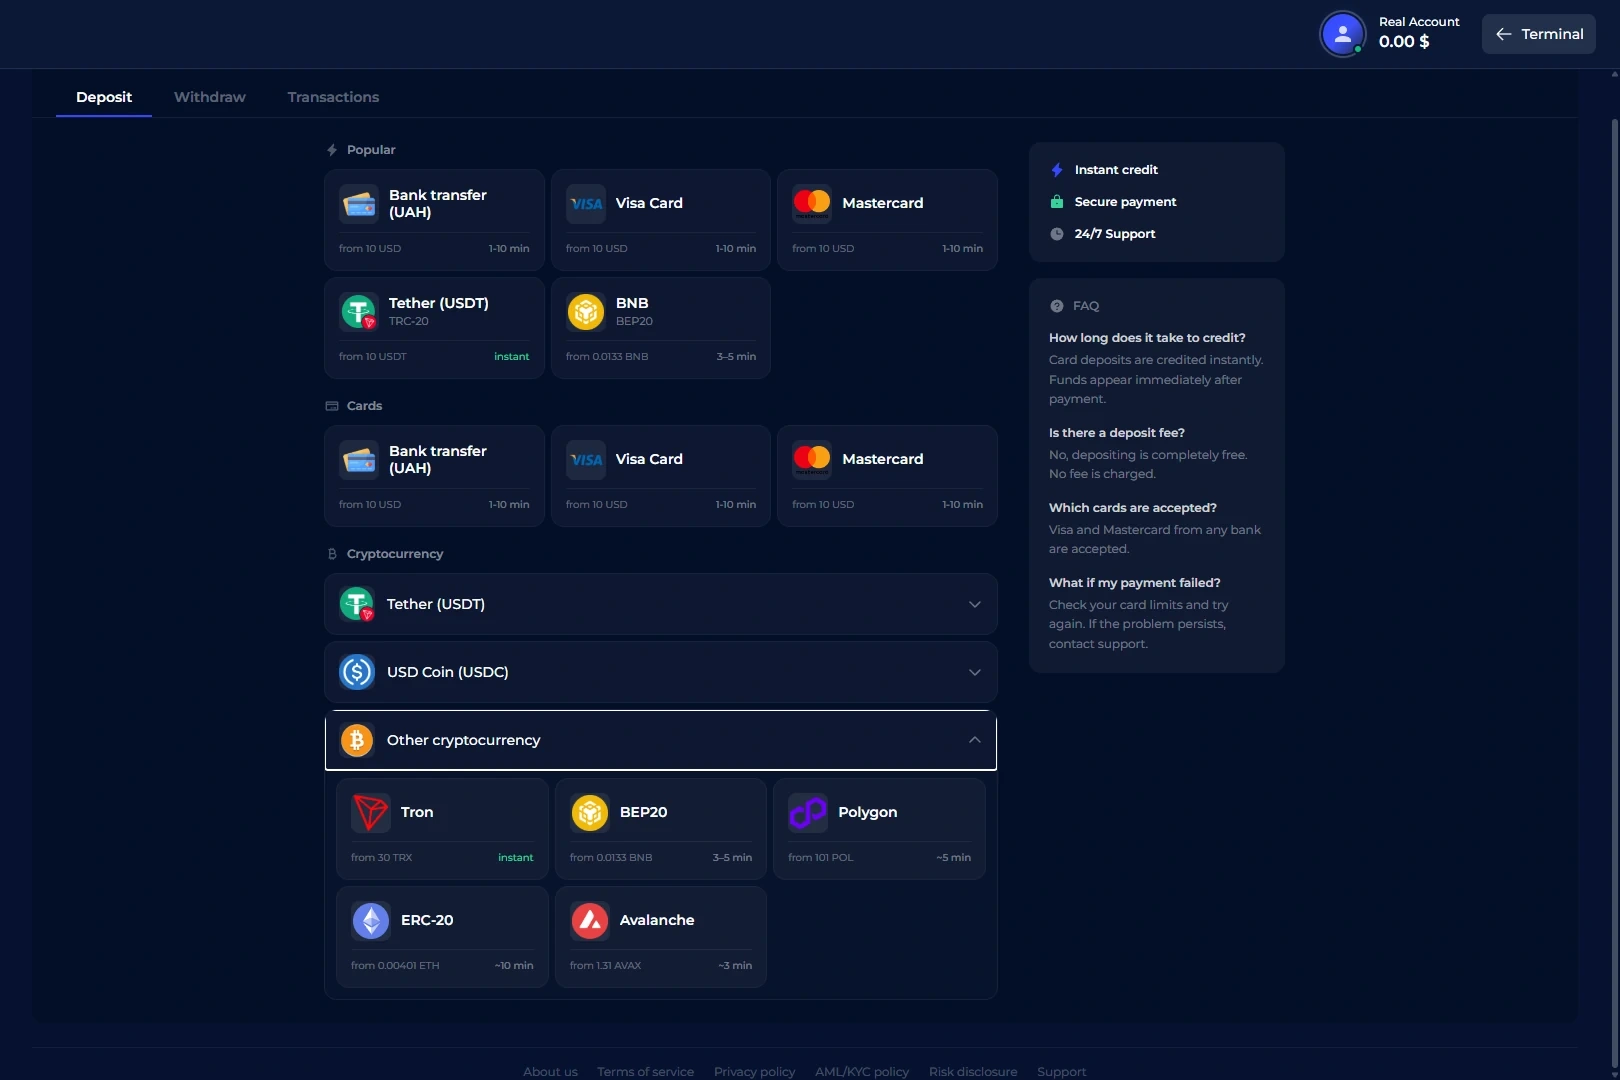
The cashier is separate from the trading ticket. In the saved English payment screen, ComforTrade presents categories of funding methods, including card and cryptocurrency options. The methods displayed in one account session should not be treated as a guarantee that every visitor will receive the same list; the available choices and their limits can depend on location and payment provider.
| Account operation | Published minimum | What to check |
|---|---|---|
| Deposit | $7 USD | The chosen payment method may show a different minimum or fee. |
| Withdrawal request | $12 USD | Balance, verification and the permitted payout destination still matter. |
These are the general USD amounts in the operator's published client and payment policies, not a quote for every method or currency conversion. When funding, open the deposit area, select a method and read the minimum shown on that particular payment form before submitting anything. The operator's terms require funding to come from a payment instrument belonging to the account holder.
For withdrawals, use the account's withdrawal section rather than attempting to reverse an earlier trade. The company states that withdrawals are normally directed to the original funding details and that a confirmed request is typically processed within up to two business days. Additional checks or payment-provider delays can extend the end-to-end time; two business days is not a guarantee that money will arrive in a bank or wallet by that point.
Identity verification can involve a government-issued document and supporting information. The operator may request further checks before or after a funding action. Eligibility is not worldwide: its current agreement lists several restricted jurisdictions. Read the applicable account terms and location requirements before registering or depositing rather than assuming that a visible sign-up form means service is available everywhere.
Using ComforTrade in a Mobile Browser
The operator describes the trading terminal as browser-based on both desktop and mobile. The saved English phone screenshot confirms that the narrow layout keeps the chart, asset label and BUY/SELL controls within the mobile workspace. It is a browser view, not evidence of an independently installed Android or iOS application.
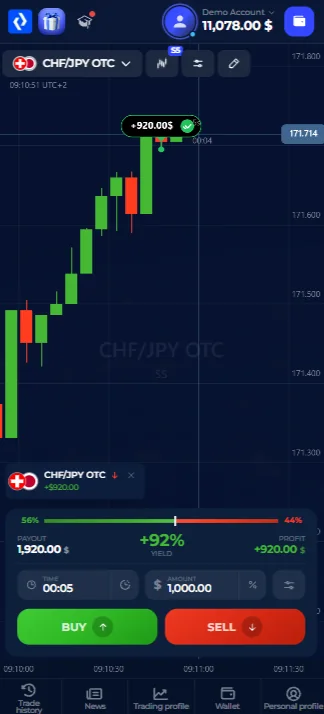
On a smaller screen the information is more tightly grouped. Before submitting an action, expand the relevant control and check the account mode, instrument, duration and amount again. If the chart takes most of the screen, move back to the ticket rather than assuming the desktop positions of buttons carry over exactly. Browser zoom and orientation can affect what is visible at once.
For straightforward access, use the operator's mobile browser workspace where it is available to your account. A downloadable native app, a particular APK file or an App Store listing has not been verified for this guide, so none is presented as the required way to use ComforTrade on a phone.
ComforTrade Questions Before You Start
What is the ComforTrade trading platform?
ComforTrade is a browser-based trading workspace where an account holder can select an instrument, view a price chart, set a contract's timing and amount, and review trading history. Account and payment functions are accessed separately from the order ticket.
Can I access ComforTrade Demo before making a deposit?
Yes. The operator's getting-started instructions state that Demo is available after account registration without an initial deposit. It uses virtual funds, not money available for withdrawal.
How do I create a ComforTrade account?
Choose Create Account, enter an email address and password, accept the required terms and submit the form. Follow any additional confirmation requested for your account, then locate the Demo balance in the trading workspace.
Where do existing users log in?
Use the platform's sign-in option for an existing account and enter the credentials used at registration. If access fails, use the account recovery instructions shown by the service rather than creating a second profile.
What do the payout percentages in the asset list mean?
They show the displayed contract payout terms for the selected instrument and session, not a probability of winning. The asset list and current trade ticket may show changing values, so inspect the live figures before acting.
Where can I review previous trades?
Open Trade History in the workspace and check the Open and Closed tabs. The Closed view is useful for reviewing settled contracts, instrument names and displayed results. Demo history should not be interpreted as real-account earnings.
What are the current minimum deposit and withdrawal amounts?
The published general minimum deposit is $7 USD and the general minimum withdrawal request is $12 USD. A payment method can have different limits or fees; verify the amounts shown in your cashier before making a transaction.
Can I use the platform in a mobile browser without installing an app?
Yes. The operator describes browser access on mobile devices. The English mobile screenshot in this guide shows a compact web terminal with the chart and trade controls. No separate native app installation is required for that browser route.